
Whether you are counting the number of bottles in a case, the quantity of screws in a kit, or any other package that needs to contain multiple products, checking that the correct number of products are in a package is essential.
For example, consider a scenario where you are assembling kits of screws for use in an at-home assembly product. You would need to make sure that each kit contains the correct number of screws. If a kit contained too few screws, the kit would be unfit for purpose, thereby increasing the risk of a refund.
Here is an image of a computer vision model identifying all the screws in a box:
Now the system knows where the screws are, we can count them in software and connect the system to business logic.
In this guide, we are going to demonstrate how to implement quantity inspection with computer vision. We will walk through how to train a custom model to identify screws, deploy the model, and count the number of screws in images. You can use the same guidance in this guide to count any product in a package.
Without further ado, let’s get started!
Machine Vision vs. Computer Vision for Quantity Inspection
Both machine vision and computer vision systems can count the quantity of objects in an image or video. Computer vision systems have an advantage: you can run multiple checks on a package at the same time and improve the model over time by adding more data.
For example, consider our screw scenario. We could both count screws and ensure that the right type of screws are packaged. If you needed four screws and four nuts, you could identify both, reliably, and count them. You could look for other objects that should not be in the package (i.e, a nail). This level of flexibility allows you to quickly adapt to changing processes or products without changing any hardware.
Implement Quantity Inspection with Computer Vision
To build a quantity inspection system, we need to train a model that can accurately identify objects of interest. For this example, we will train a model to identify screws. You can use the guidance below to identify multiple different objects of interest.
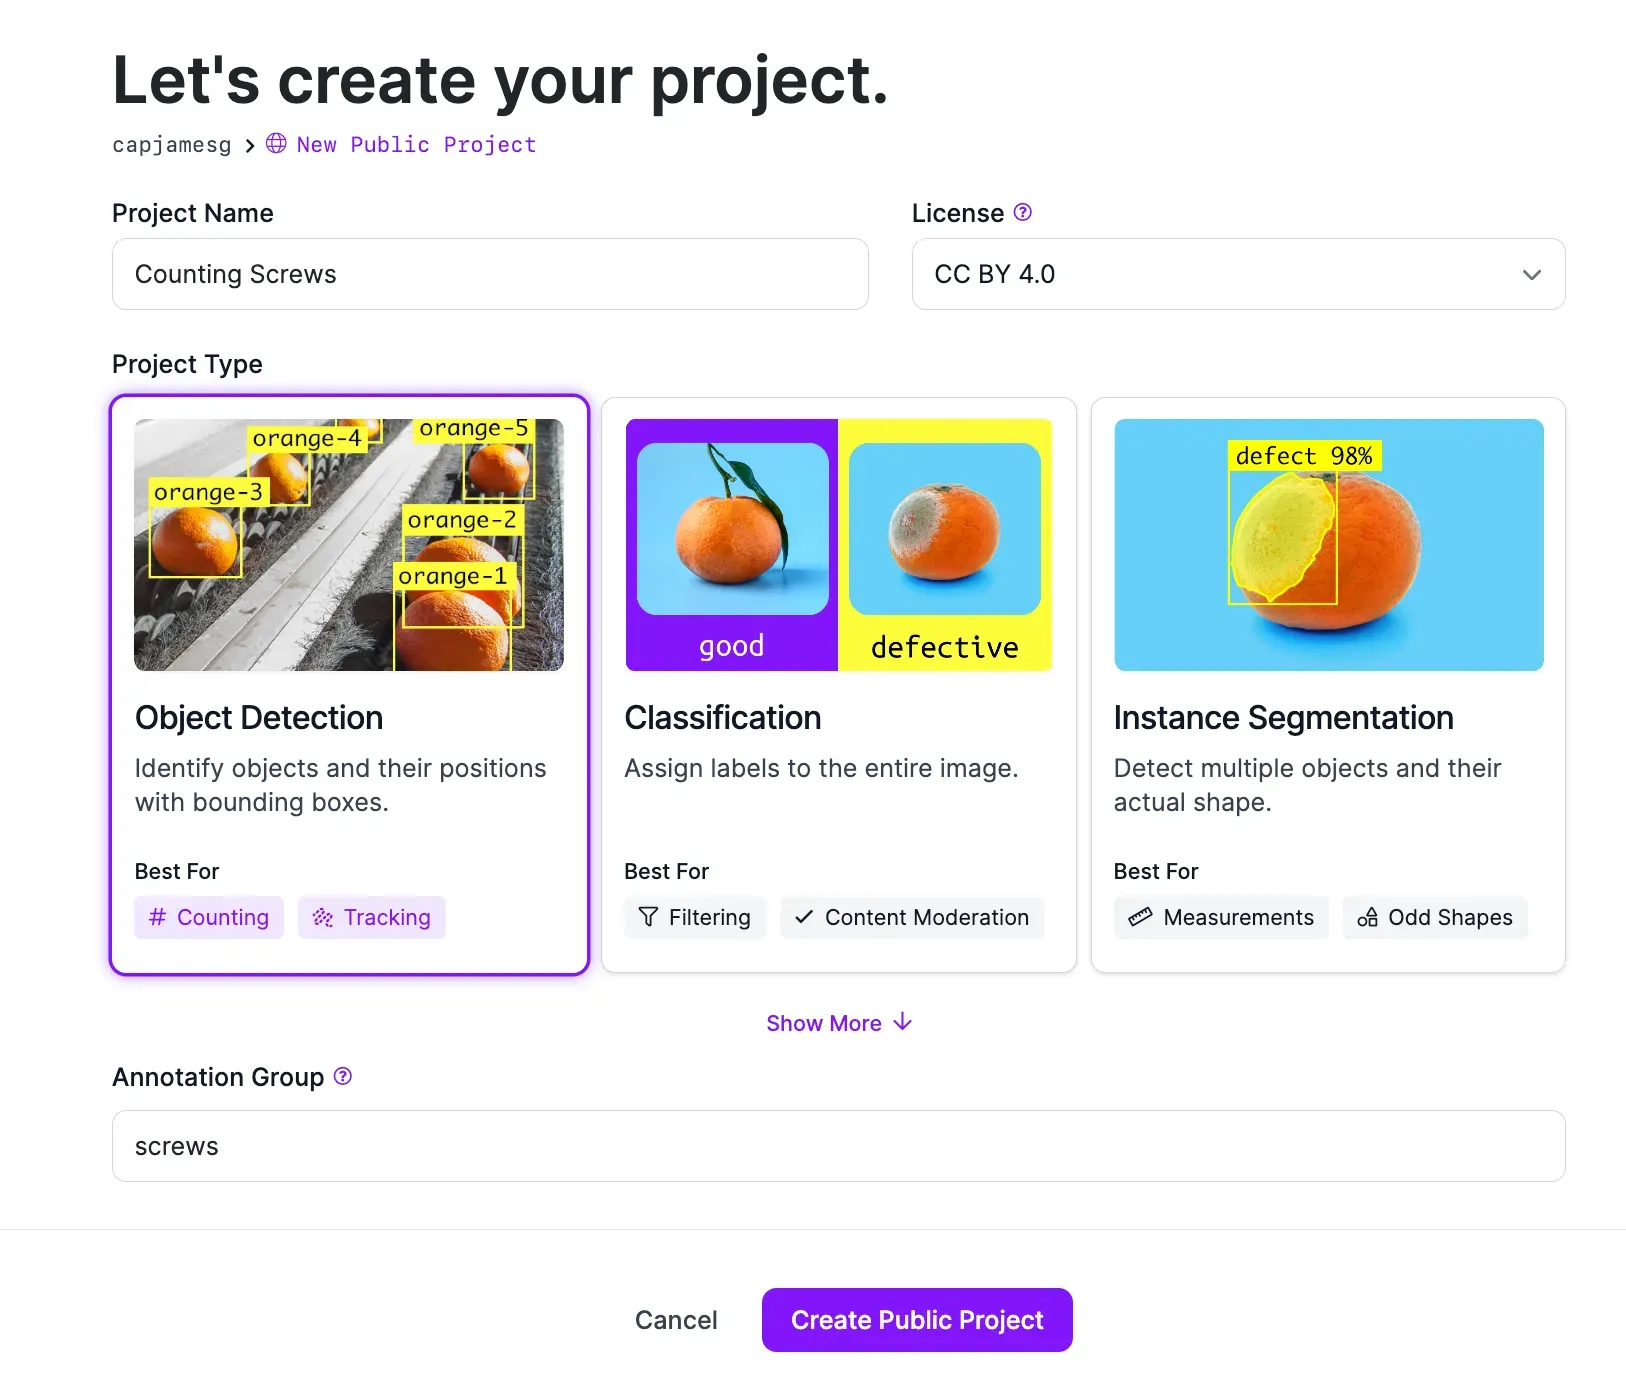
Step #1: Create a Project
Create a free Roboflow account. Then, click the “Create a Project” button on the Roboflow dashboard. You will be taken to a page where you can set up your project. On this page, set a name for your project. Choose the “Object Detection” project type.
Step #2: Upload Data
Once you have created a project, you will be taken to a page where you can upload images. On this page, upload images or videos that feature your object of interest. We recommend starting with 50-100 images.
Ideally, these images and videos should be gathered from the environment in which your model will be used. For example, if your model will be deployed on an assembly line, you may want to collect images or videos of your product on an assembly line.
To upload images or videos, drag them into the Roboflow web interface. Your images will load onto the web page. Use this open source screws dataset if you'd like to download images for use as you follow this guide.
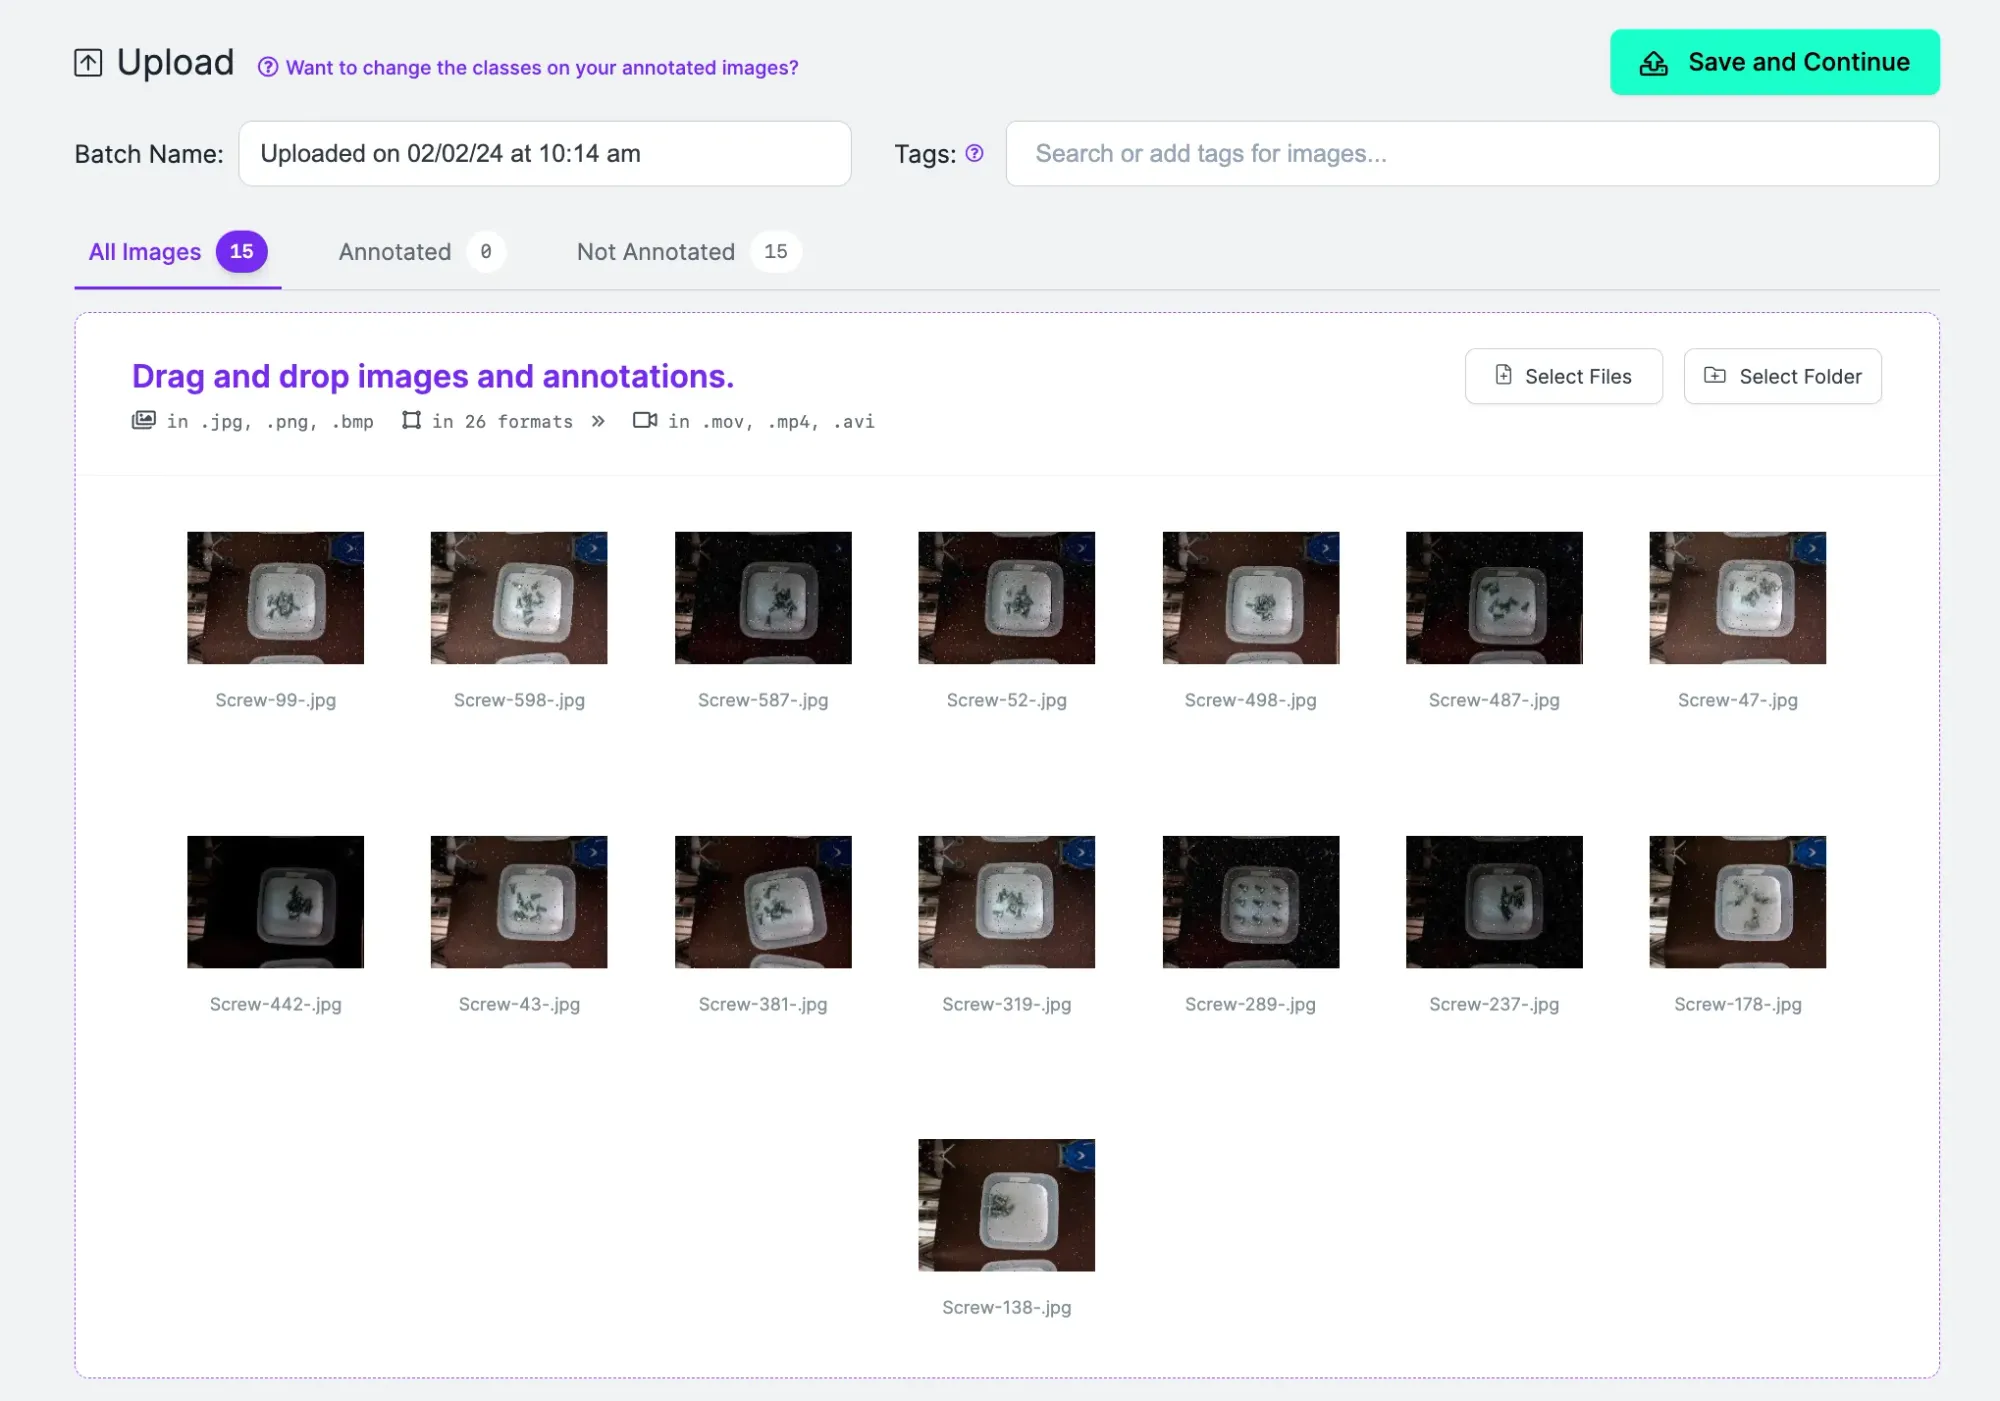
Once your data has loaded, click “Save and Continue” to upload your images to Roboflow.
Step #3: Label Data
Click Annotate on the Roboflow sidebar. Then, choose an image from your dataset. The Roboflow Annotate web interface will appear. From this interface, you can label regions of interest in an image. These labels will be used to build your vision system.
We need to draw boxes around all screws in our image. To do so, press the “b” key on your keyboard. This will enable the “bounding box” tool, which is used to label data for object detection models. Then, click where you want to start drawing a box on the screen. Drag to draw the box. When you have surrounded the object of interest in a box, stop clicking.
Repeat this process for all objects of interest in the image.
Step #4: Generate a Dataset
Next, we need to generate a dataset. A dataset is a frozen-in-time snapshot of the images you have labeled. You can apply preprocessing and augmentation steps to your dataset to boost the accuracy of your model.
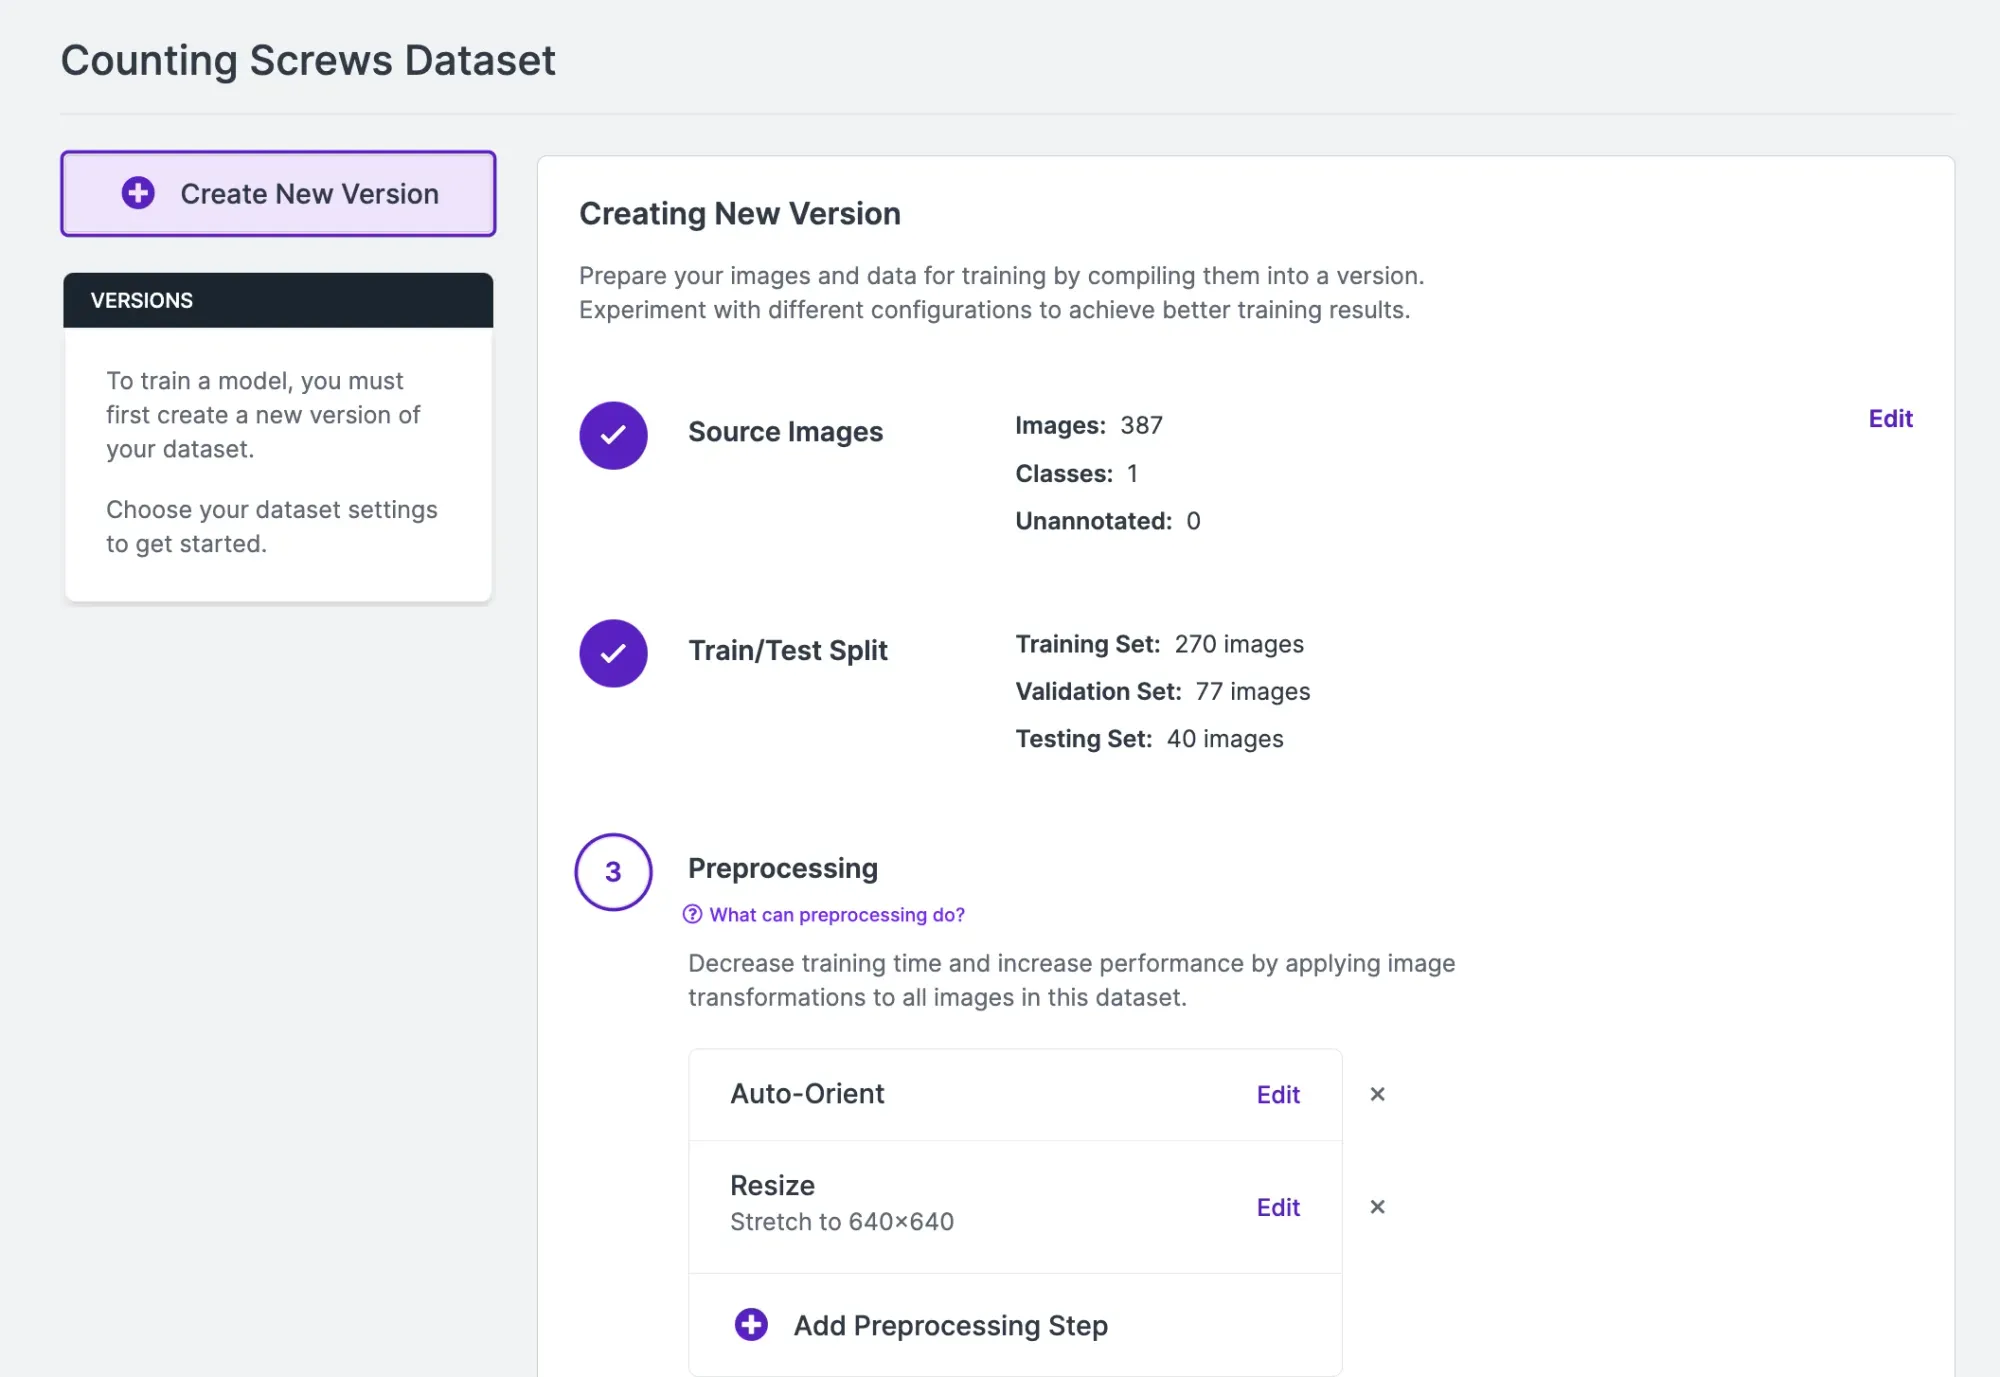
For the first version of our system, we are going to leave the default preprocessing and augmentation steps. This is so that we are able to develop a baseline understanding of how our model performs on our data.
To generate a dataset, click “Generate” in the sidebar. Then, scroll down to the bottom of the page and click “Create”. A version of your dataset will be generated. You will then be taken to a page where you can train your model.
Step #5: Train a Model
Click the Train with Roboflow button to start training a model.
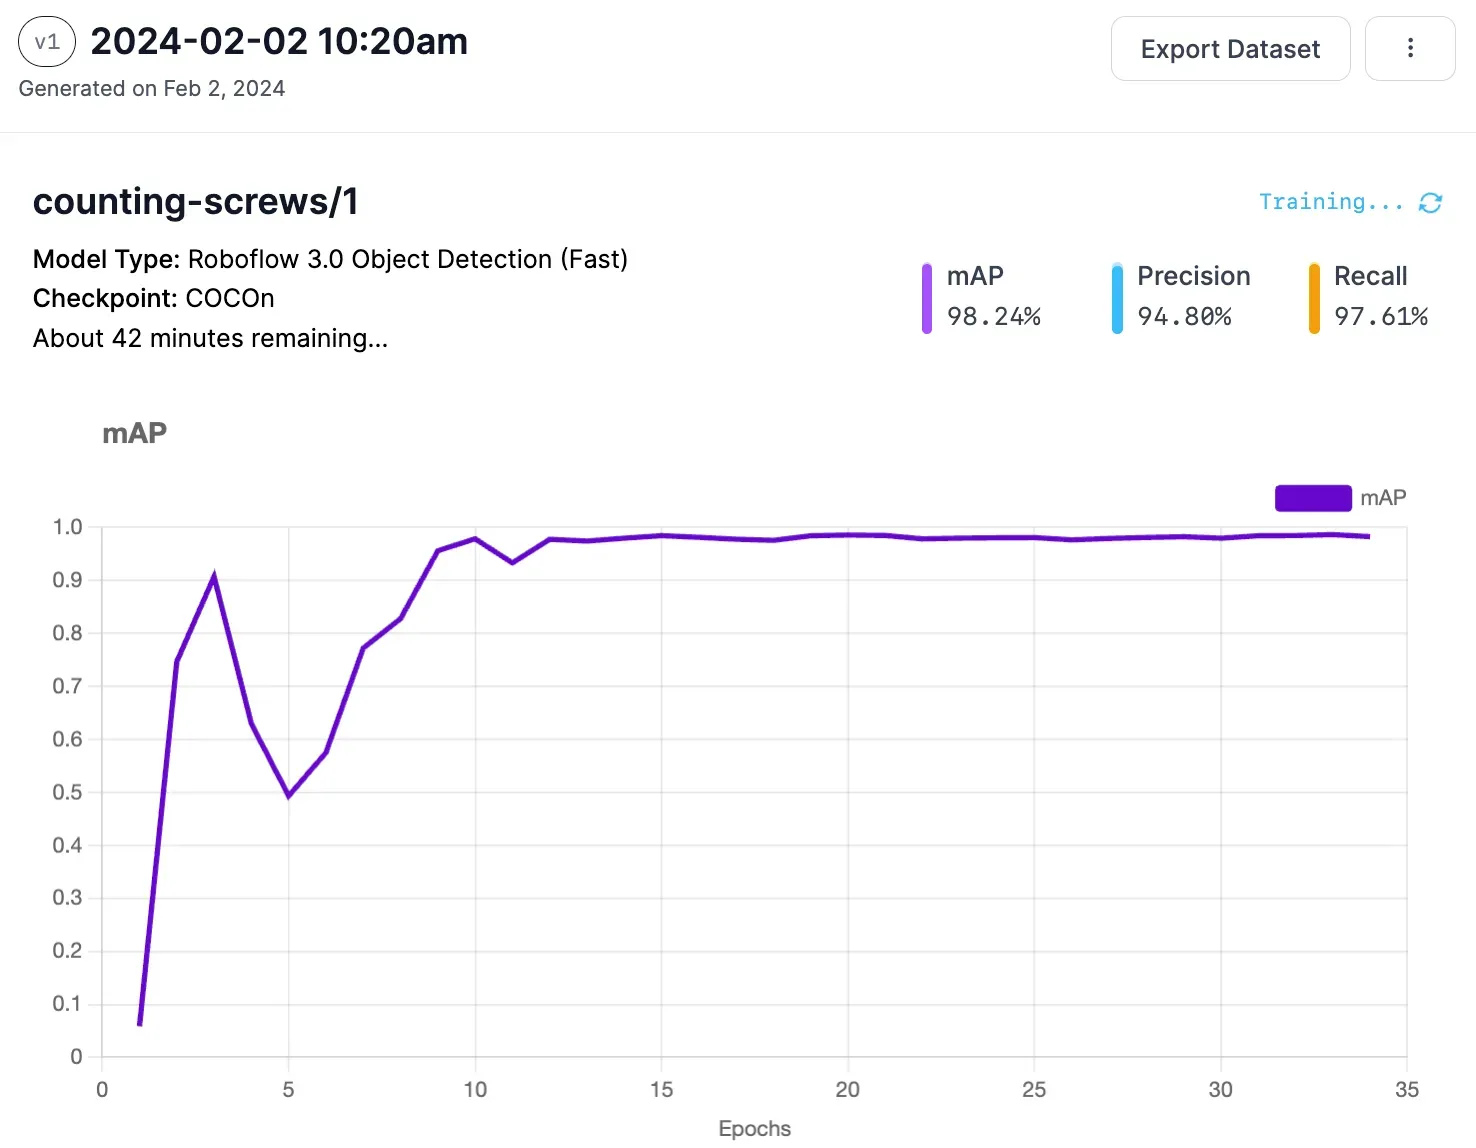
A window will appear in which you can configure your training job. When asked, select Fast training and ensure that you train from the Microsoft COCO checkpoint.
Once you have configured a training job, the job will be allocated to a server. You will receive an estimate that shows roughly how long we think it will take to train your model. You can check in on your training job in real time. Graphs will appear that show the performance of your model as it is training:
Step #6: Test the Model
With a trained model ready, you should test the model in the Roboflow web interface to ensure it performs as expected. Click “Visualize” in the Roboflow sidebar to test the model. You can upload a custom image to use in testing or select an image from your Test set.
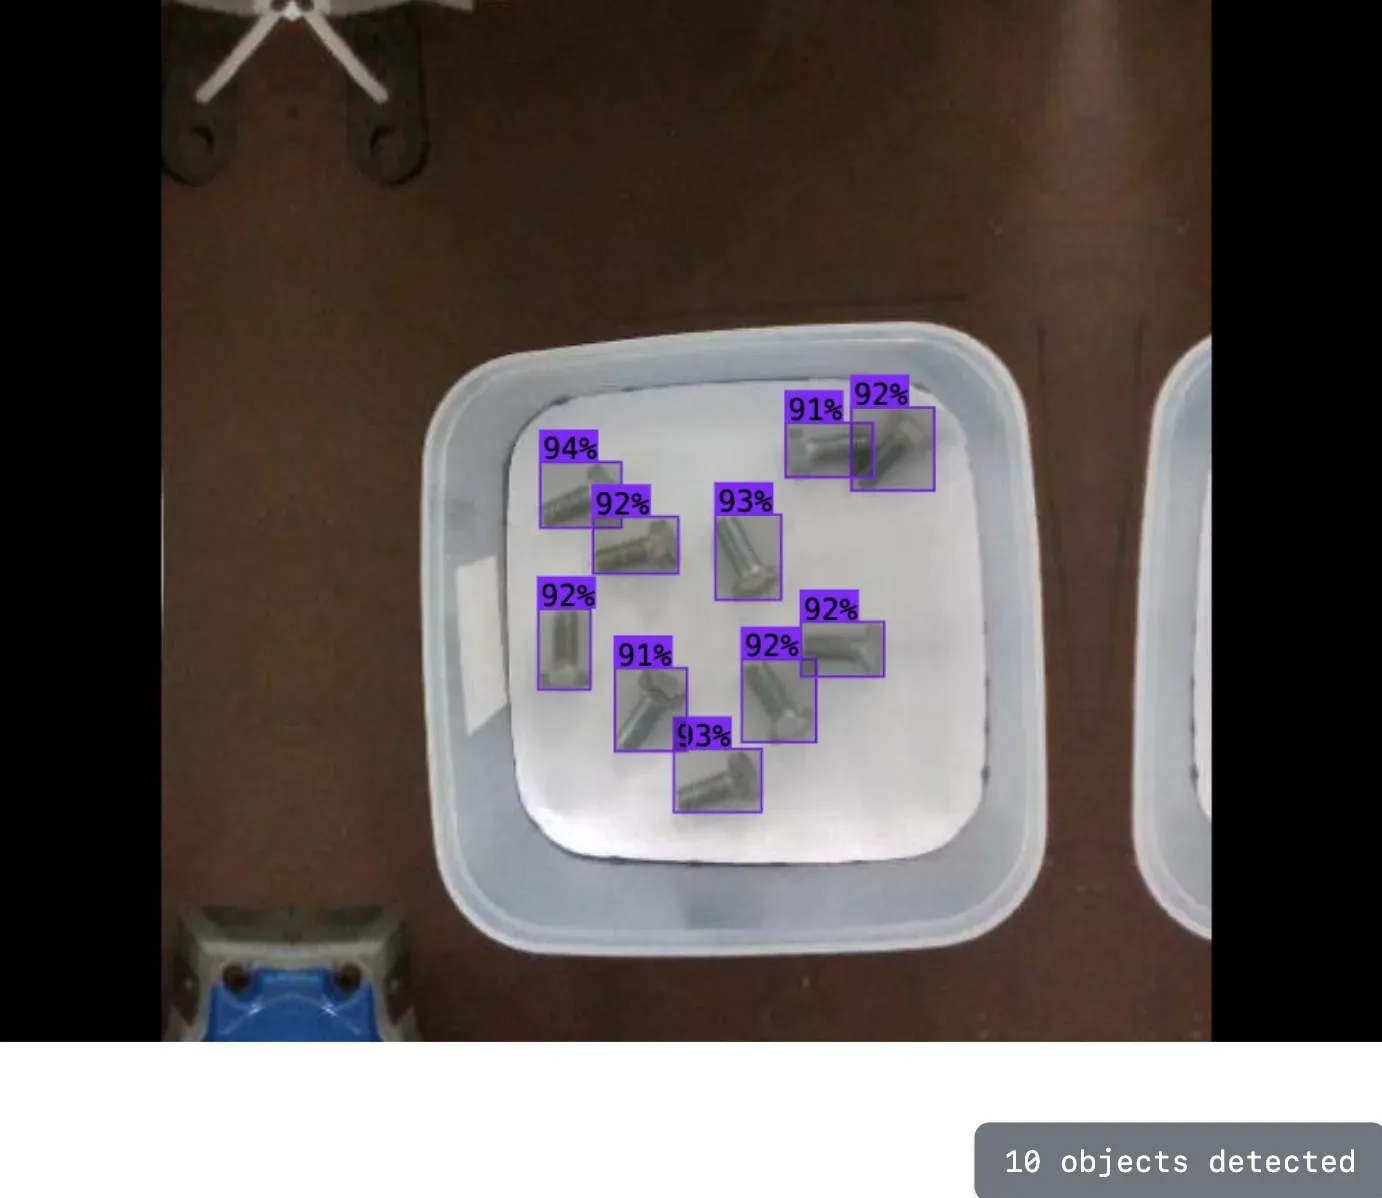
Here is an example of our screw detection model running on an image:

Our model successfully identified the location of all the screws in our image.
Step #6: Deploy the Model
You can deploy your model on your own hardware using Roboflow Inference. Inference is a high-performance system for running computer vision models.
To install Inference, run:
pip install inferenceWe are going to use supervision to process the results from our model. To install supervision, run:
pip install supervisionWith the required dependencies installed, create a new Python file and add the following code:
from inference import get_roboflow_model
import supervision as sv
import cv2

image_file = "image.jpeg"
image = cv2.imread(image_file)

model = get_roboflow_model(model_id="counting-screws/1")

results = model.infer(image)

detections = sv.Detections.from_roboflow(results[0].dict(by_alias=True, exclude_none=True))

if len(detections) == 10:
  print("10 screws counted. Package ready to move on.")
else:
  print(len(detections), "screws counted. Package is not ready.")
In this code, we run our model on an image. We then use supervision to count the number of screw predictions returned by our model. If the number of screws is not equal to 10, we print a message that states that the incorrect number of screws is present in the package. Otherwise, we say the package is ready to move on.
Let’s run our code on the following image:

Our code returns:
10 screws counted. Package ready to move on.Our model successfully identified nine screws. Our system says the package is ready to move on to the next step of manufacturing.
Conclusion and Next Steps
Quantity inspection systems ensure that the correct number of products are packaged on an assembly line.
In this guide, we developed a system that identifies and counts the number of screws in a box using computer vision. We created a project in Roboflow, labeled objects of interest (screws), trained a model using our data, and deployed our model on our own hardware.
This guide identifies one type of object but you can identify multiple objects with computer vision. For example, you could also identify and count nuts and bolts. To do so, you would add images of nuts and bolts to your dataset and label the objects of interest.
If you need assistance training your own vision model, contact the Roboflow sales team. Our sales team are experts in developing custom computer vision solutions for manufacturing and logistics use cases.