You can use computer vision to count the number of products present in packaging. This is ideal for assuring the count of food and drink product packaging. For example, you can implement a check that ensures a box contains 12 bottles before being sealed and prepared for distribution. If a box doesn’t contain the right number of bottles, it can be sent for additional processing.
In this guide, we are going to demonstrate how to build a missing item inspection system with computer vision. This system can be deployed in real time on any camera that can connect to a computer, without requiring dedicated hardware specifically for missing item detection.
We will walk through an example of checking to ensure the right number of bottles is present in a package. To build a system, you will:
- Collect and upload images with objects of interest.
- Label images.
- Generate a dataset.
- Train a model.
- Deploy the model on your own hardware.
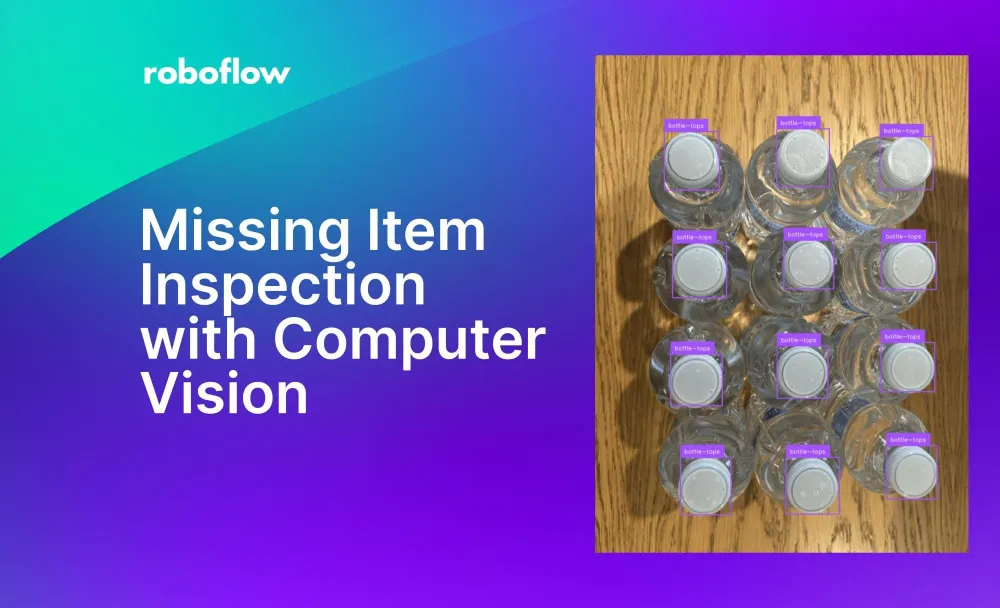
By the end of this guide, we will have a system that can identify the tops of bottles and ensure the correct number is present. Here is an example of our system identifying all the bottle tops in an image:
This system is designed to be run after a bottle cap presence check. This is because bottle cap presence checks are typically run from the side, allowing you to identify both if a cap is missing and whether a cap is properly attached to a bottle.
Without further ado, let’s get started!
Create a Roboflow Project
To get started, first create a Roboflow account. Then, click “Create a Project” on your Roboflow dashboard. You will be taken to a page where you can create your project.
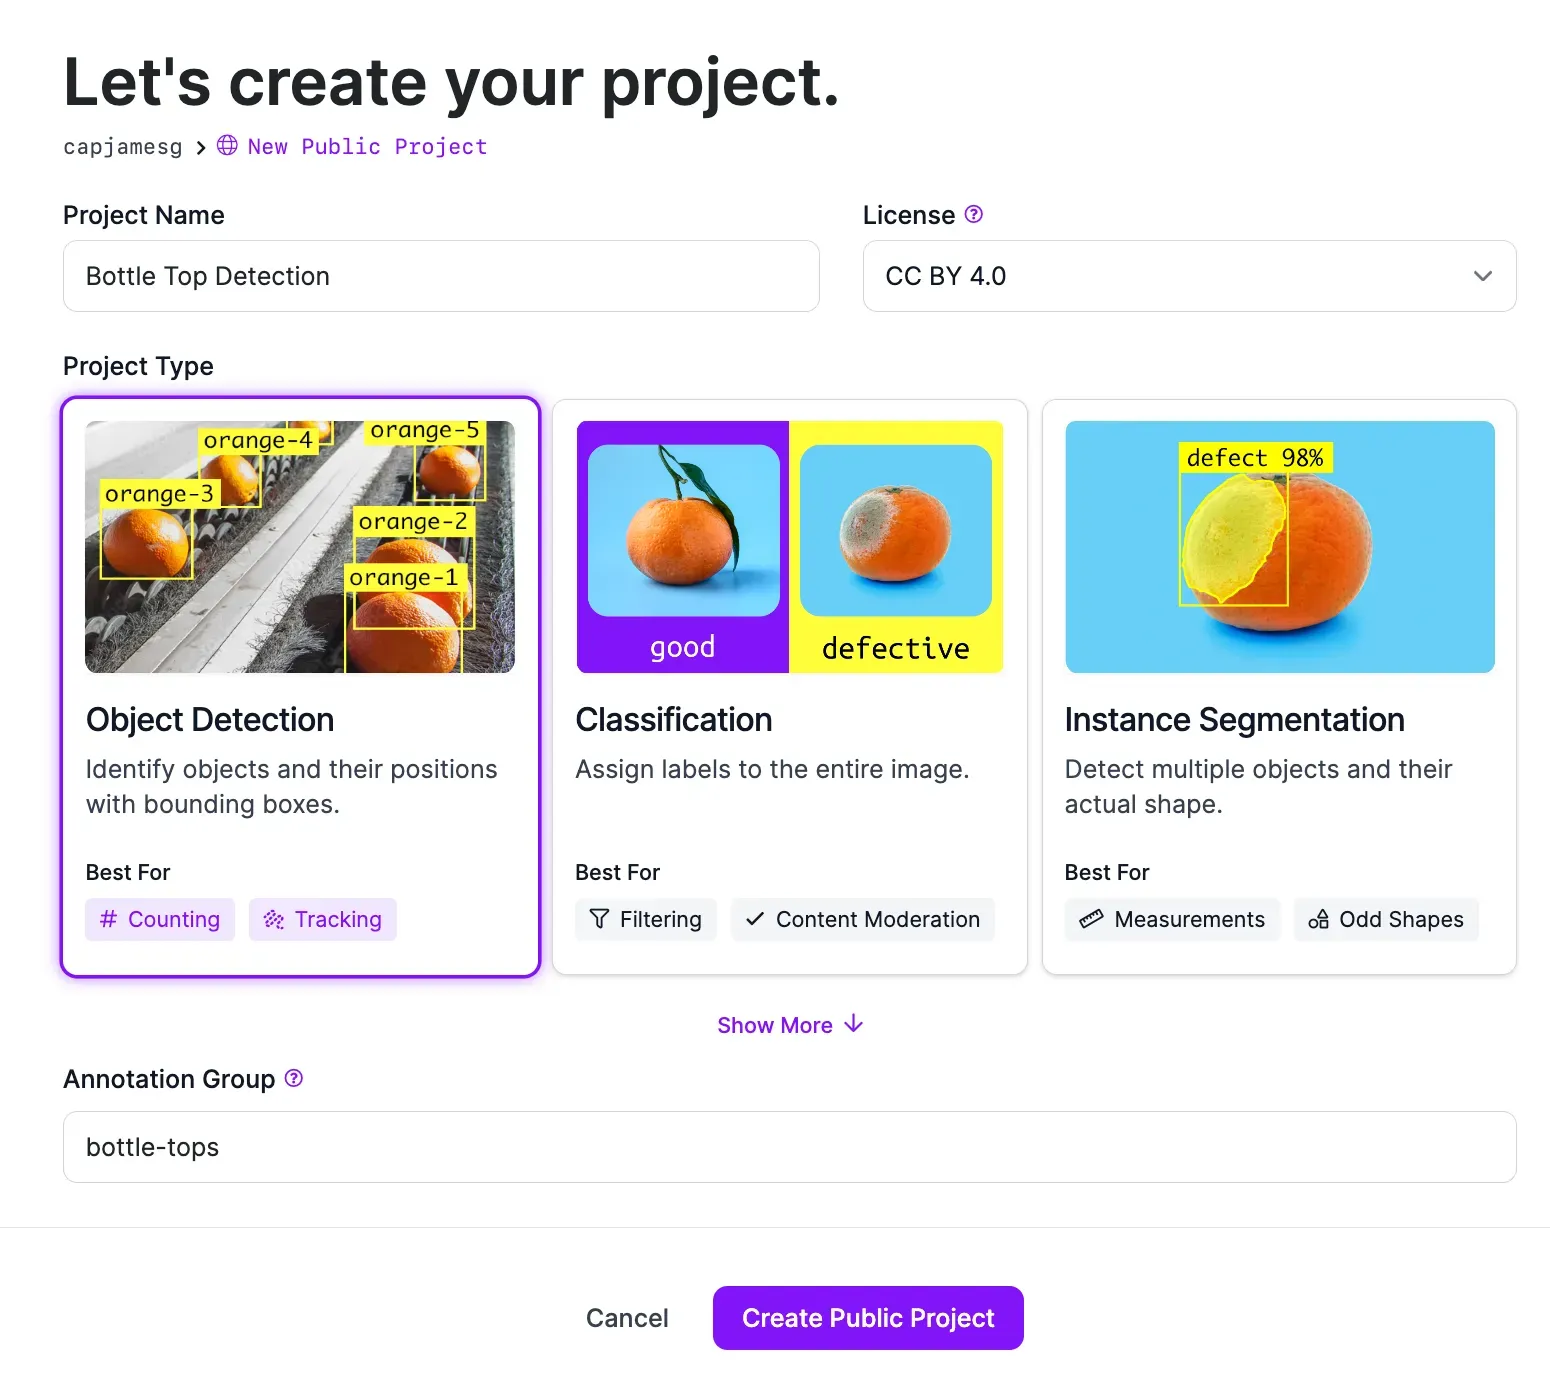
Fill out all the forms on the page. When asked to choose a project type, select “Object Detection”. This is because we are going to train an object detection model to identify items.
Click “Create Project” to create your project.
Step #1: Upload Images
Once you have created a project, you will be asked to upload images.
You should collect images or videos that are representative of the environment in which your model will be deployed. For this use case, we are going to collect images that show bottles from a top-down view. We will then label the bottle tops so that we can count the number of bottles.
We recommend starting with 25-50 images if you are identifying one object.
Once you have images, you can upload them to Roboflow by dragging them onto the upload data page to which you were taken after creating your project.
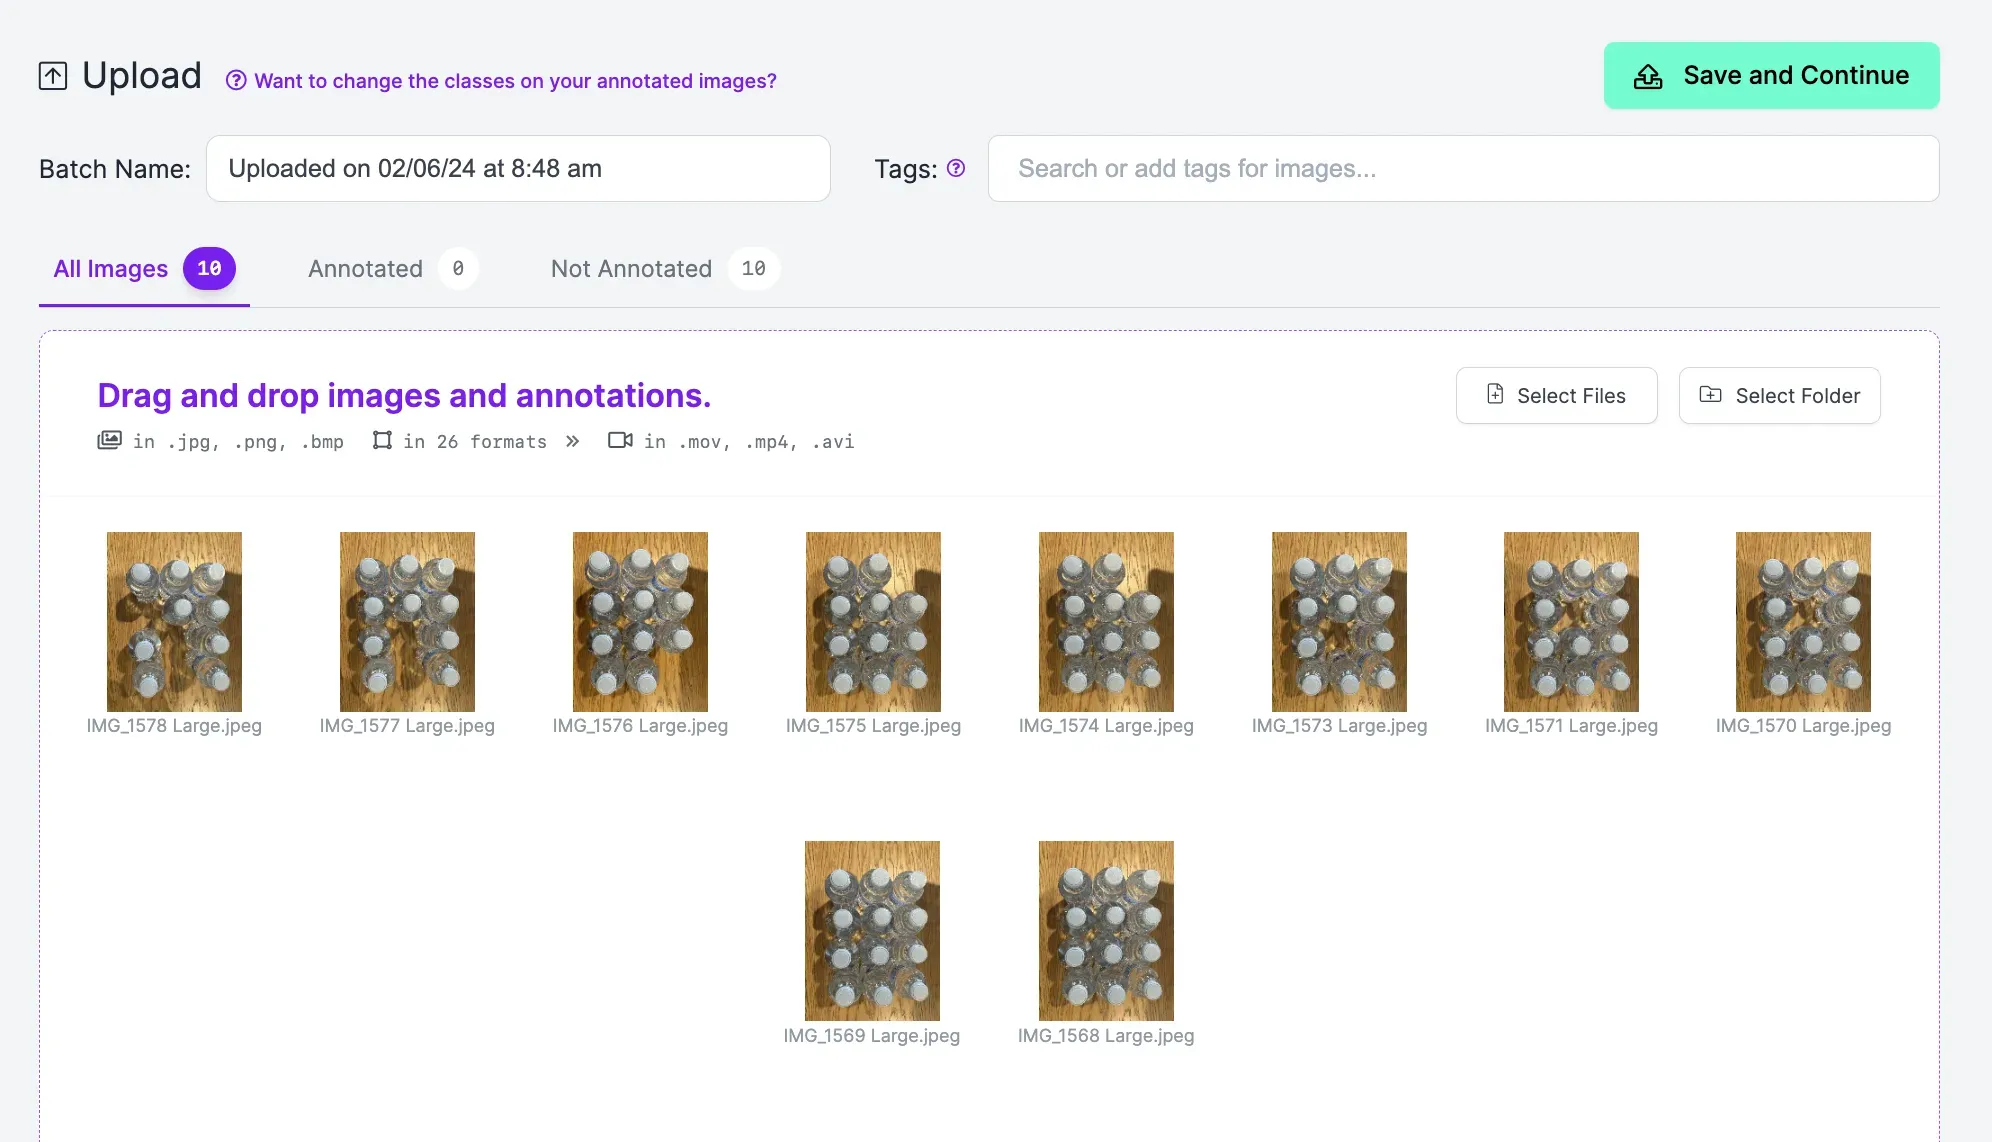
When your images have been processed, click ‘Save and Continue”. Your images will be uploaded to Roboflow for use in labeling and training your model.
Step #2: Label Images
Next, you need to label your images. This involves drawing bounding boxes around objects of interest. For this guide, we will label bottle tops. If our model can identify bottle tops, we can add a check in our system that says if the number of identified bottle tops is not equal to a specific number – for example, 12 – then a package should be sent back for further processing.
You may be able to label your images automatically depending on what object you want to identify. To learn about automated image labeling, refer to the Roboflow Automated Labeling guide.
To start labeling images, click “Annotate” in the left sidebar. Then, select an image to start labeling.
You will be taken to the Roboflow Annotate tool in which you can label your images.
We will label images with the bounding box tool. To start using this tool, press “b” on your keyboard. Then, click where you want to start drawing your box. Drag around the region you want to label. Then, stop dragging your cursor when you have labeled the bottle cap.
Repeat this process for all the images in your dataset.
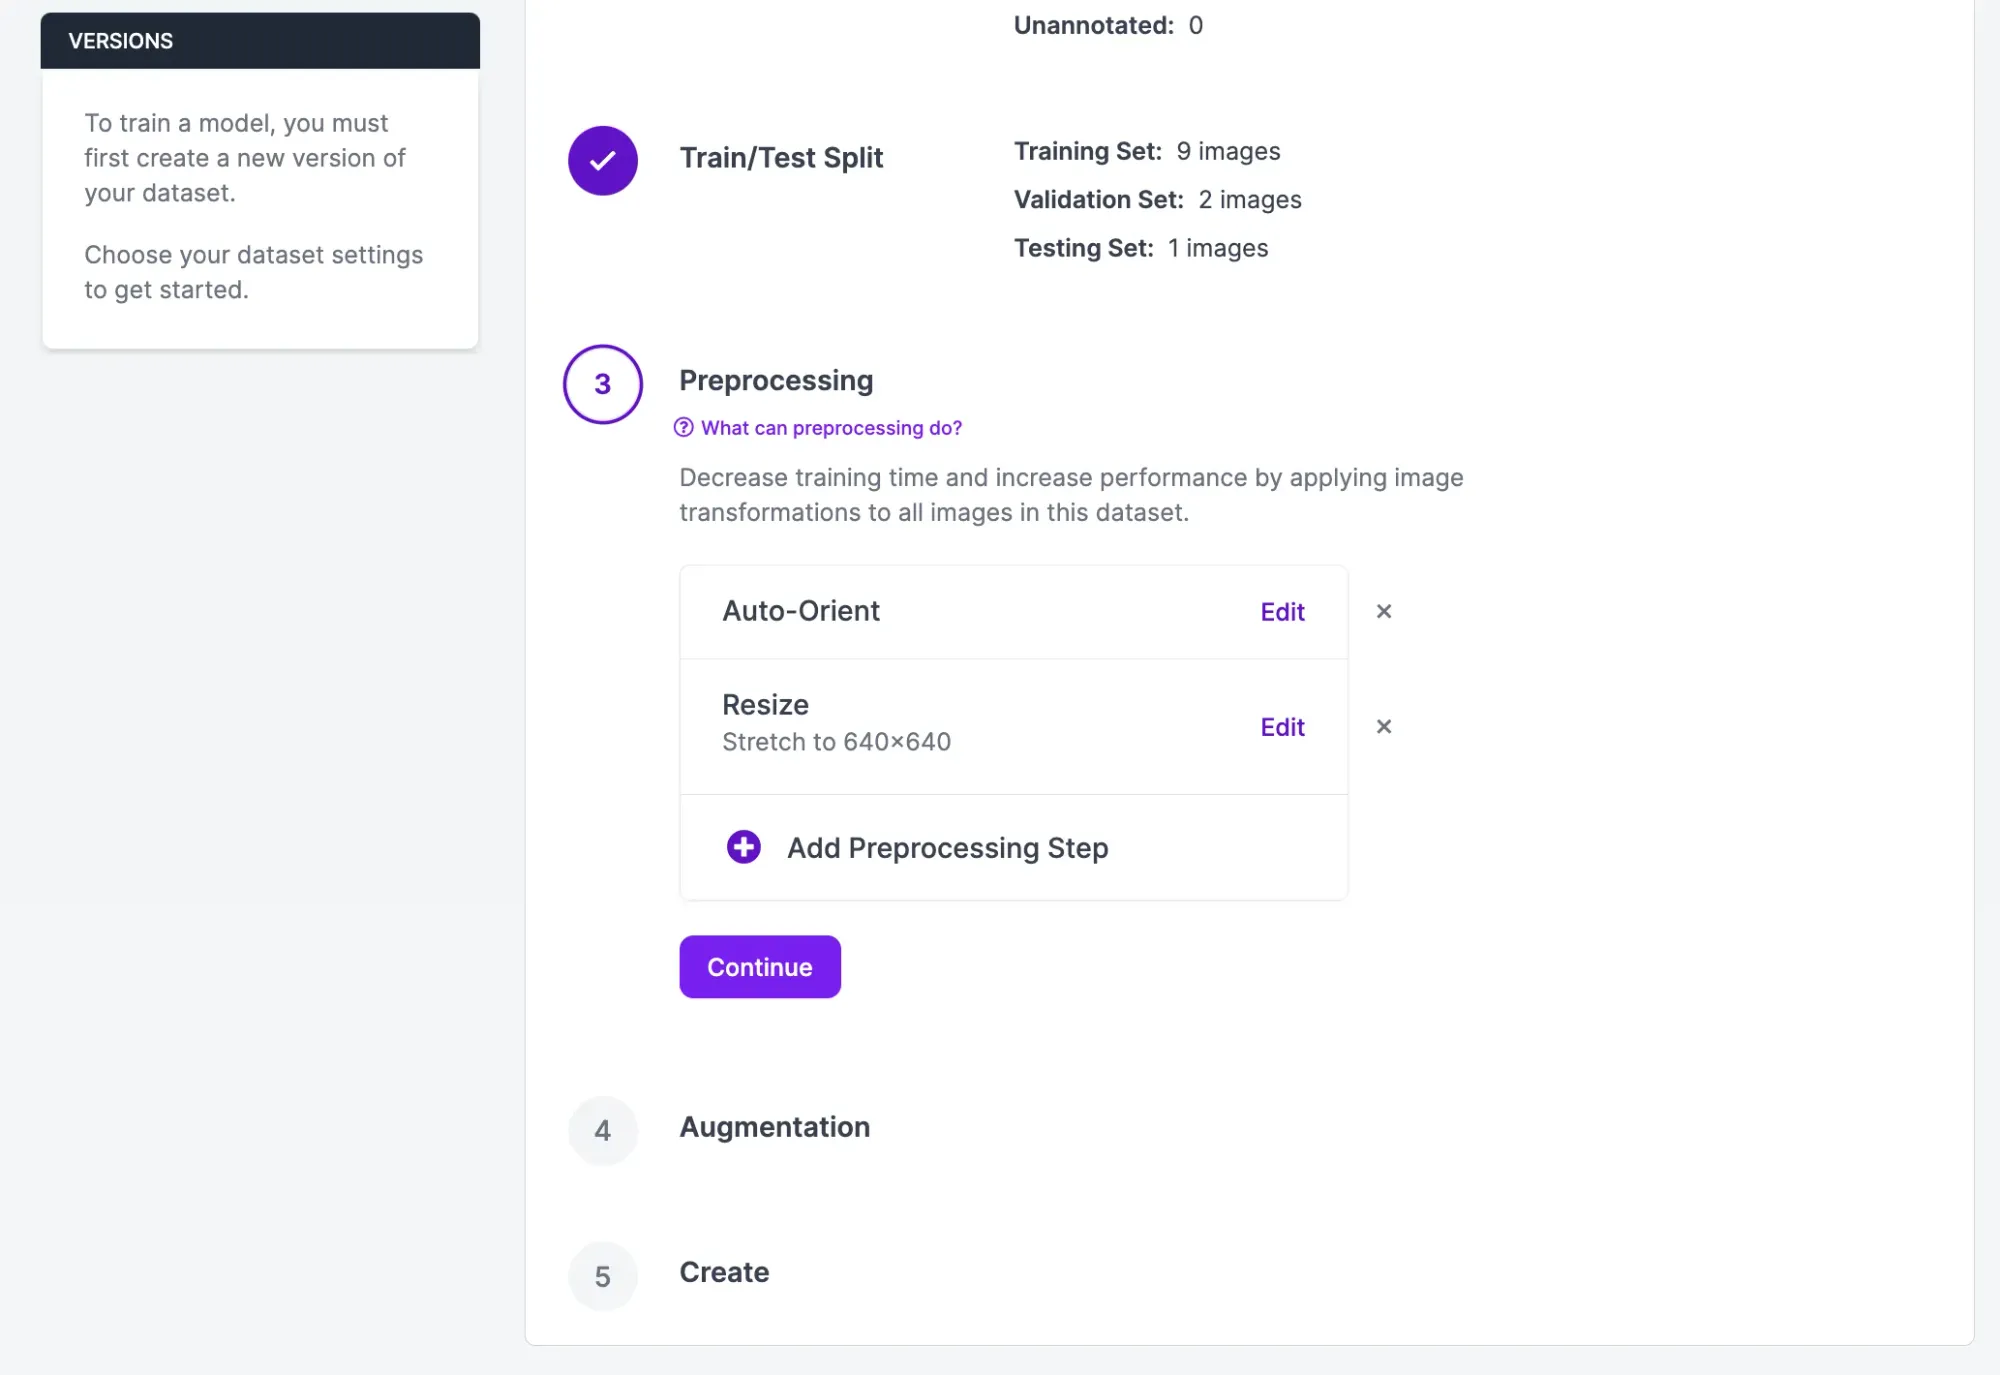
Step #3: Generate a Dataset
With your images labeled, you can generate a dataset. Datasets are snapshots of your labeled images on which you can train a model. You can apply preprocessing and augmentation steps to datasets. Preprocessing steps prepare your data for training and augmentation steps, when used correctly, can boost model performance.
To generate a dataset, click “Generate” in the Roboflow sidebar.
For your first model version, we recommend leaving all preprocessing and augmentation steps as their defaults. This allows you to understand how your model works using your labeled data. If there is anything wrong with your model, you can go to your data without having to disable augmentations, try again, and eventually discover your data quality is the problem.
When you are refining the performance of your model, preprocessing and augmentation can help. Refer to our guide on preprocessing and augmentation for best practices.
Scroll down to the bottom of the page and click “Generate” to generate your dataset.
The amount of time it takes to generate your dataset will vary depending on how many images are in your dataset and what preprocessing steps and augmentations you have applied.
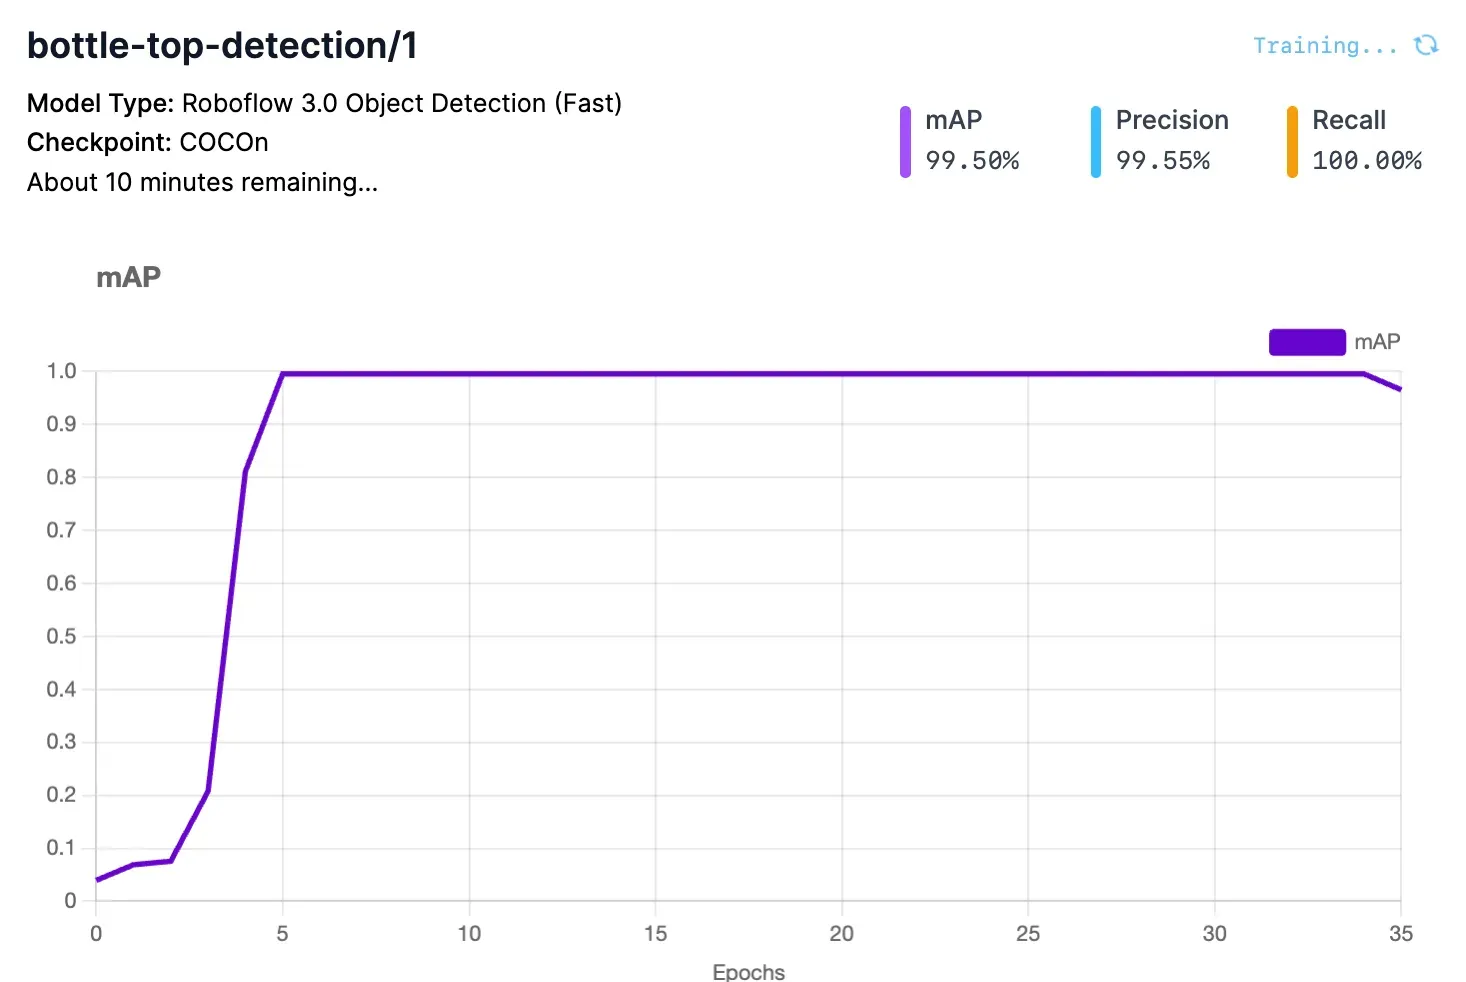
Step #4: Train a Model
Once your dataset has been generated, you can train a model. To start a training job, click “Train with Roboflow” on your dataset page. When asked, choose “Fast” training and train from the Microsoft COCO checkpoint. Using pre-trained weights for transfer learning helps model performance.

Once you have configured your training job, your model training will be allocated to a server. You will be presented with an estimate that reflects how long we think your model training job will take.
You can view performance of your model training job in real time from your dataset page. You will receive an email when the training process has completed.
Once your model is ready, you can test it from the “Visualize” tab, accessible from the left sidebar. To test your model, you can select an image from your test set using the on-page selector. You can also drag an image onto the page to test your model.
Let’s test our model:
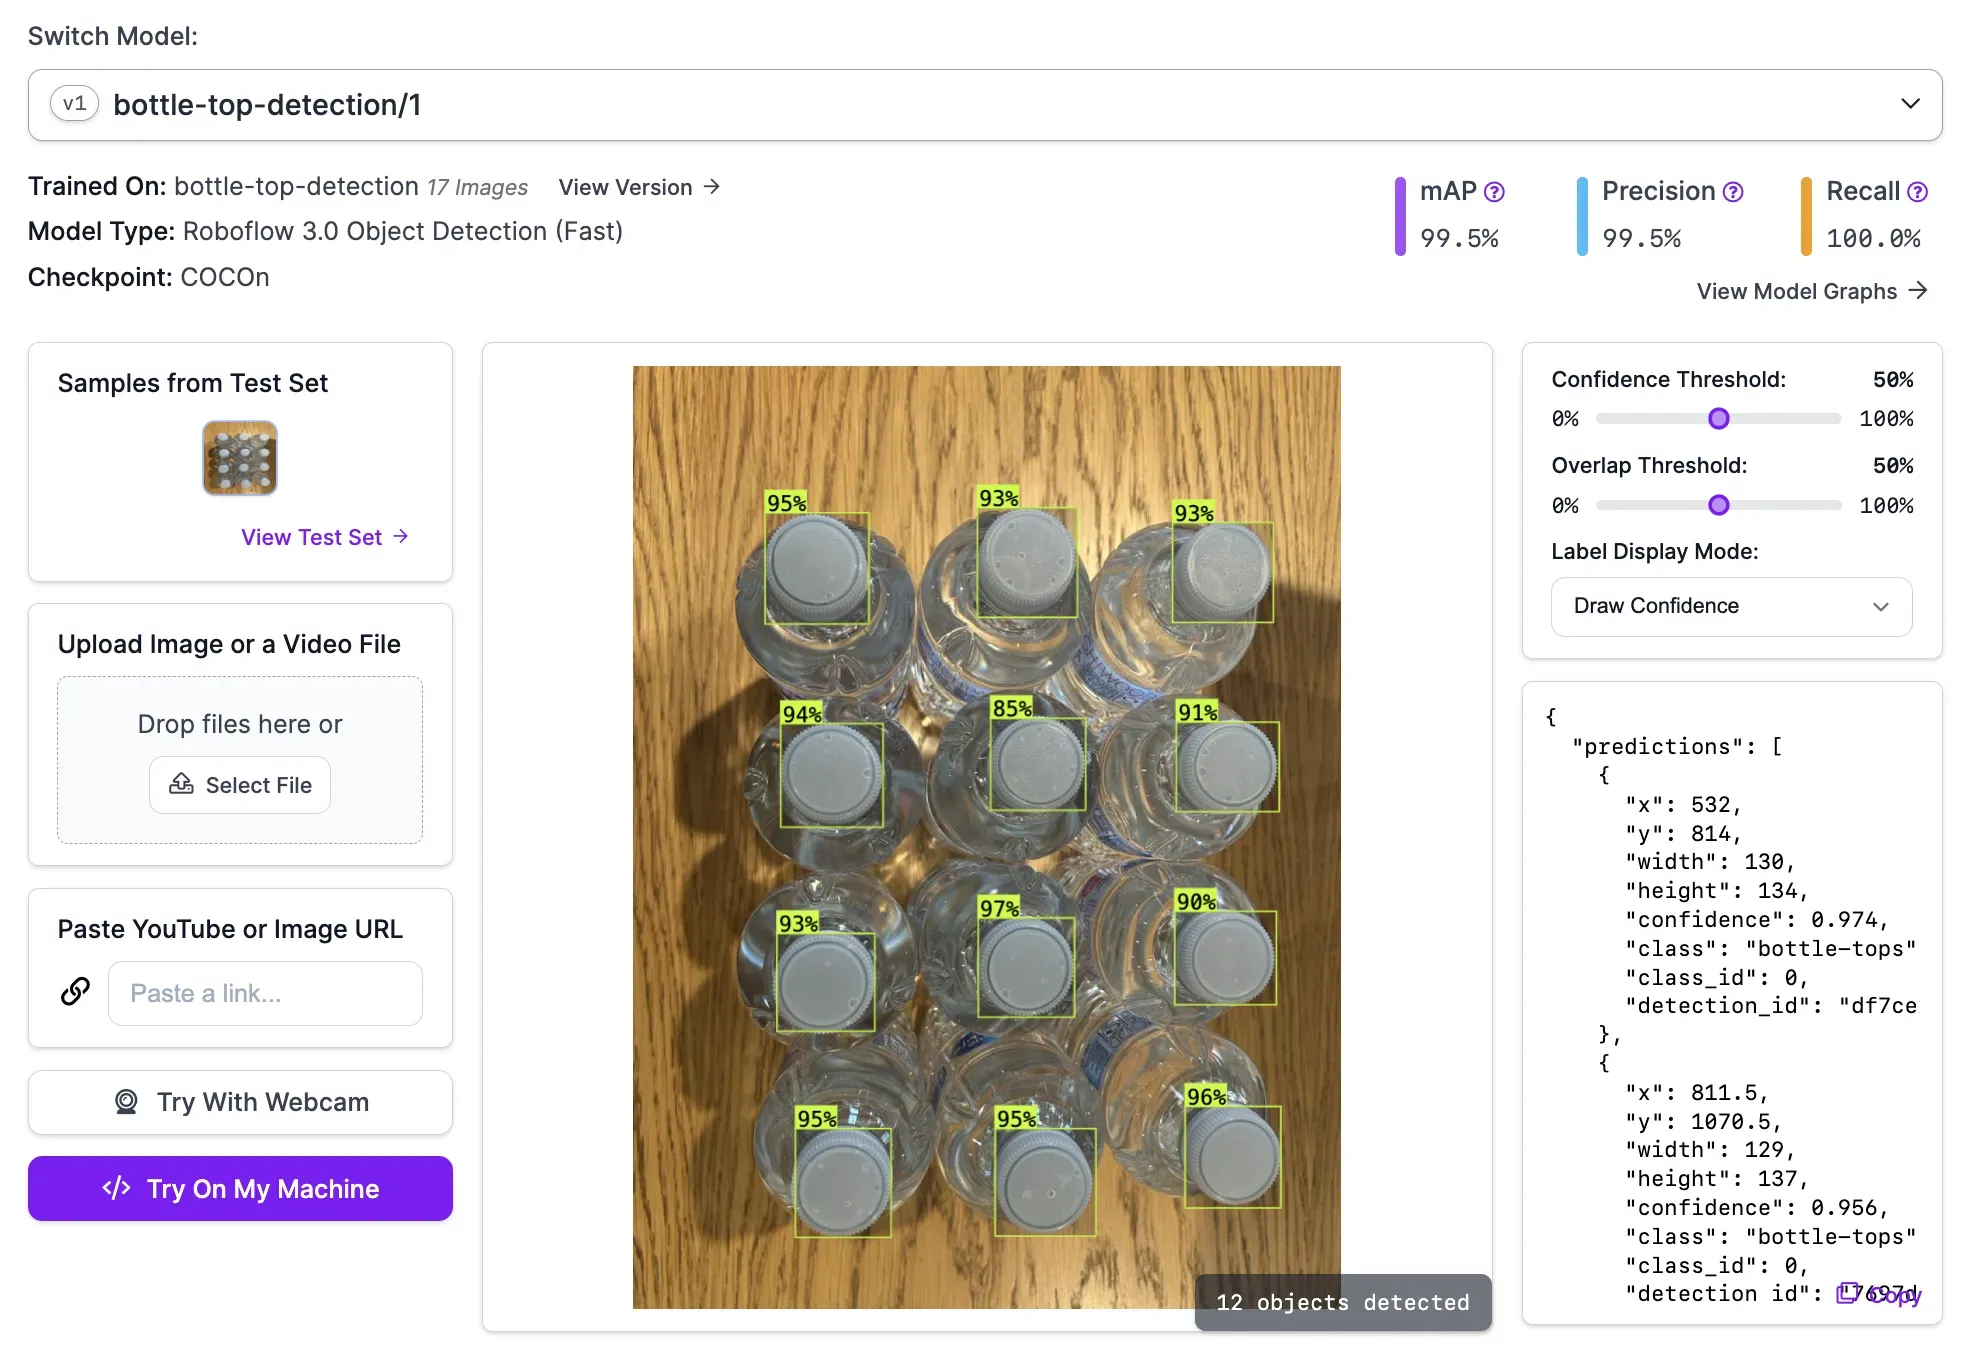
Our model successfully counted 12 bottle tops. In the next step, we will build a check that reports an error when the number of bottle tops is not equal to 12.
Step #5: Deploy the Model
You can use Roboflow Inference to run your model on your own hardware. Inference is optimized for high performance, allowing you to get the most of your model on your device.
There are several utilities available that will help you deploy your model quickly. For example, Inference has tools for running a model on a camera or an RTSP stream. Indeed, you can use any camera you can connect to a computer to run your model.
First, we need to install Inference and supervision. We will use supervision to process our model predictions. To install these dependencies, run:
pip install inference supervisionThen, create a new Python file and add the following code:
from inference import get_roboflow_model
import supervision as sv
import cv2

image = cv2.imread("bottles.jpg")

model = get_roboflow_model(model_id="bottle-top-detection/1")

results = model.infer(image)

labels = [i.class_name for i in results[0].predictions]
detections = sv.Detections.from_roboflow(results[0].dict(by_alias=True, exclude_none=True))

bounding_box_annotator = sv.BoundingBoxAnnotator()
label_annotator = sv.LabelAnnotator()

annotated_image = bounding_box_annotator.annotate(
    scene=image, detections=detections)
annotated_image = label_annotator.annotate(
    scene=annotated_image, detections=detections, labels=labels)

sv.plot_image(annotated_image)

print("Number of bottles detected: ", len(detections))
This code runs inference on an image. Then, we count the number of bottle tops in the image. We visualise the predictions, then we the bottle count to the console.
Here are the predictions plotted on an image run through the model:
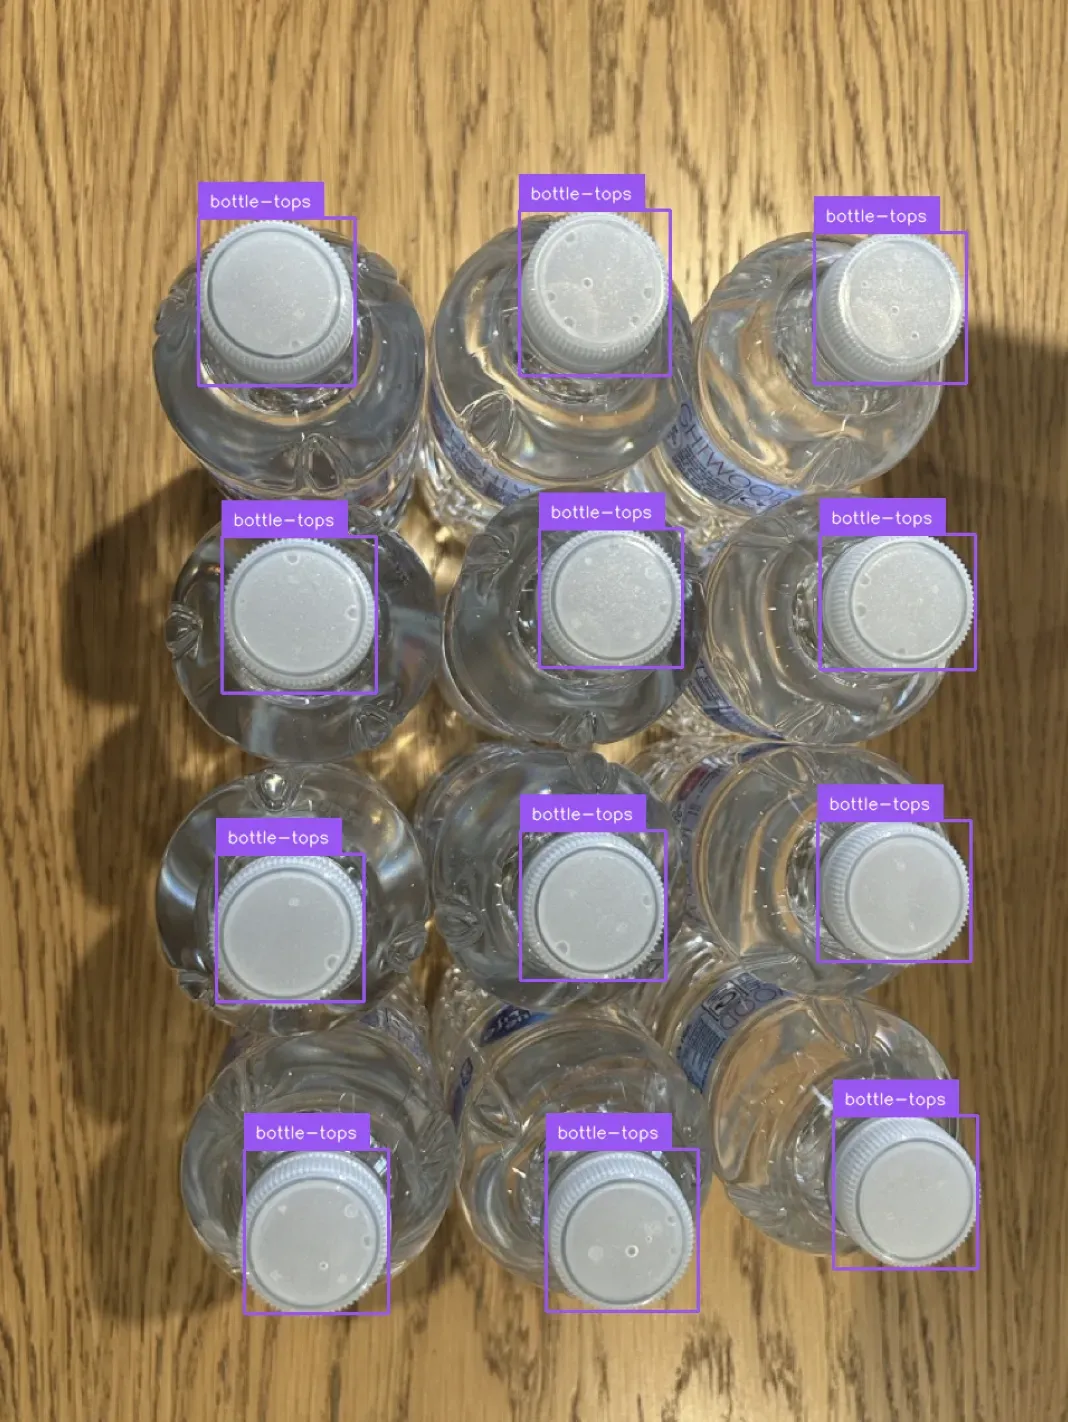
Our script prints the following to the console:
Number of bottles detected: 12Our system successfully identified the number of bottles present in the image.
You can connect this model to your business logic. For example, you can reject boxes with fewer than a specific number of bottles so that they can be remedied as necessary. You can build a system that alerts when there is a higher than normal incidence rate of missing bottles.
Conclusion
You can use computer vision to identify missing items in food and drink products. In this guide, we walked through how to train a computer vision model to identify bottles. We collected image data, labeled objects of interest (bottle caps), trained a model, tested the model in Roboflow, then deployed the model using Roboflow Inference.
We wrote custom logic that counts the number of bottles identified by our model. If less than 12 bottle tops are identified, our system prints out an error notifying us that there is a missing product. Packages where the wrong number of bottles are detected could be sent back for further processing to ensure the correct number of bottles is in the package.
If you need assistance training your own vision model, contact the Roboflow sales team. Our sales team are experts in developing custom computer vision solutions for manufacturing and logistics use cases.