
Correct placement of labels on packages is essential for shipping and sorting operations. If a label is placed in the incorrect place on a package, it may be unreadable or not fully readable by automated systems. This could cause several problems. For example, if a label is not placed correctly on a package entering a warehouse, the item may not be inventoried or routed correctly.
In this guide, we are going to show you how to verify label placement on packages using computer vision. We will use a pre-trained model to demonstrate the logic you need to verify label placement. Then, we will discuss how you can train a model that achieves the highest accuracy for your use case.
Below is an image of a computer vision system identifying the position of a label in a specific box.
We can compute whether the label is in the right quadrant to verify label placement, which we will do in this guide.
Without further ado, let’s get started!
Computer Vision vs. Machine Vision for Label Placement
Both computer vision and machine vision systems can be used for assuring that labels are placed correctly on a package.
With that said, computer vision systems are more flexible, allowing you to run multiple checks at the same time using one camera and updating your system without changing your hardware. For example, you can verify label placement and scan a barcode to ensure the barcode is readable by a machine using a single camera. This is less expensive than buying dedicated cameras for each separate check you need to run when a package enters or exits your facility.
How to Verify Label Placement on Packages
To verify label placement on packages, we will use a computer vision model to identify labels, then use custom logic to ensure the labels are in the correct place.
Create a free Roboflow account. You can use this account to retrieve an API key for use in querying the package and label detection model we will use in this guide.
Step #1: Run the Universe Model
Once you have a Roboflow account, navigate to the Box Detection model on Roboflow Universe. This model has been trained to identify two objects:
- A box, and;
- A label.
Using the identified positions of a box and its label, we can run a check to ensure the label is in the correct location (i.e. in the top left or bottom right corner).
Before we build out this logic, let’s test the model. You can do so by dragging an image onto the Box Detection model page. You can also upload a video or choose an image from the test set. The test set contains example images you can use to evaluate a model.
Here is an example of the model running on an image with four boxes:
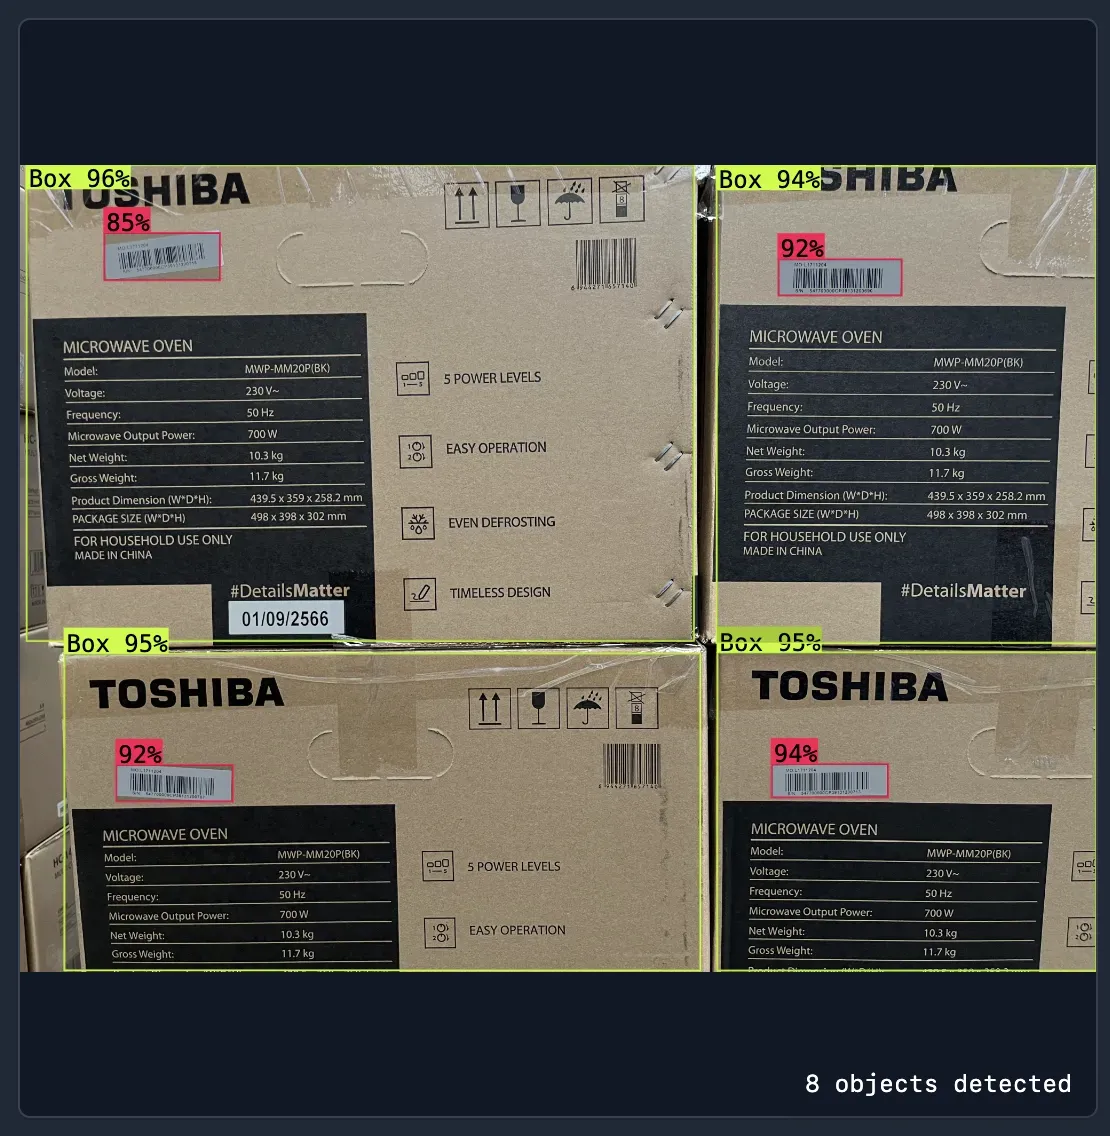
The model identified four boxes. On each box, the model successfully identified the location of a barcode label.
If this model struggles on your own data, skip to the “Next Steps: Train Your Own Model” section below. In this section, we talk about how to build a system tuned to the type of packages and labels that you need to identify.
Step #2: Deploy the Model
You can deploy this computer vision model on your own hardware using Roboflow Inference. Inference is a high-performance server for running computer vision models used by enterprises for manufacturing and logistics use cases.
To install Inference, run:
pip install inferenceWe also need to install supervision, a Python package with utilities for working with the outputs from vision models:
pip install supervisionYou will need to set your Roboflow API key in an environment variable called ROBOFLOW_API_KEY. To do so, run:
export ROBOFLOW_API_KEY="key"Replace “key” with your Roboflow API key.
Once you have Inference and supervision installed, create a new Python file and add the following code:
from inference import get_roboflow_model
import supervision as sv
import cv2

image = cv2.imread("image.jpg")

model = get_roboflow_model(model_id="ceramic-tile-defect-detection/1")

results = model.infer(image)

labels = [i.class_name for i in results[0].predictions]
detections = sv.Detections.from_roboflow(results[0].dict(by_alias=True, exclude_none=True))

bounding_box_annotator = sv.BoundingBoxAnnotator()
label_annotator = sv.LabelAnnotator()

annotated_image = bounding_box_annotator.annotate(
    scene=image, detections=detections)
annotated_image = label_annotator.annotate(
    scene=annotated_image, detections=detections, labels=labels)

sv.plot_image(annotated_image)
In this code, we use Inference to retrieve predictions from our model. The first time this code runs, our model weights – the model itself – will be downloaded to our system for use with Inference. Then, we run our model on an image.
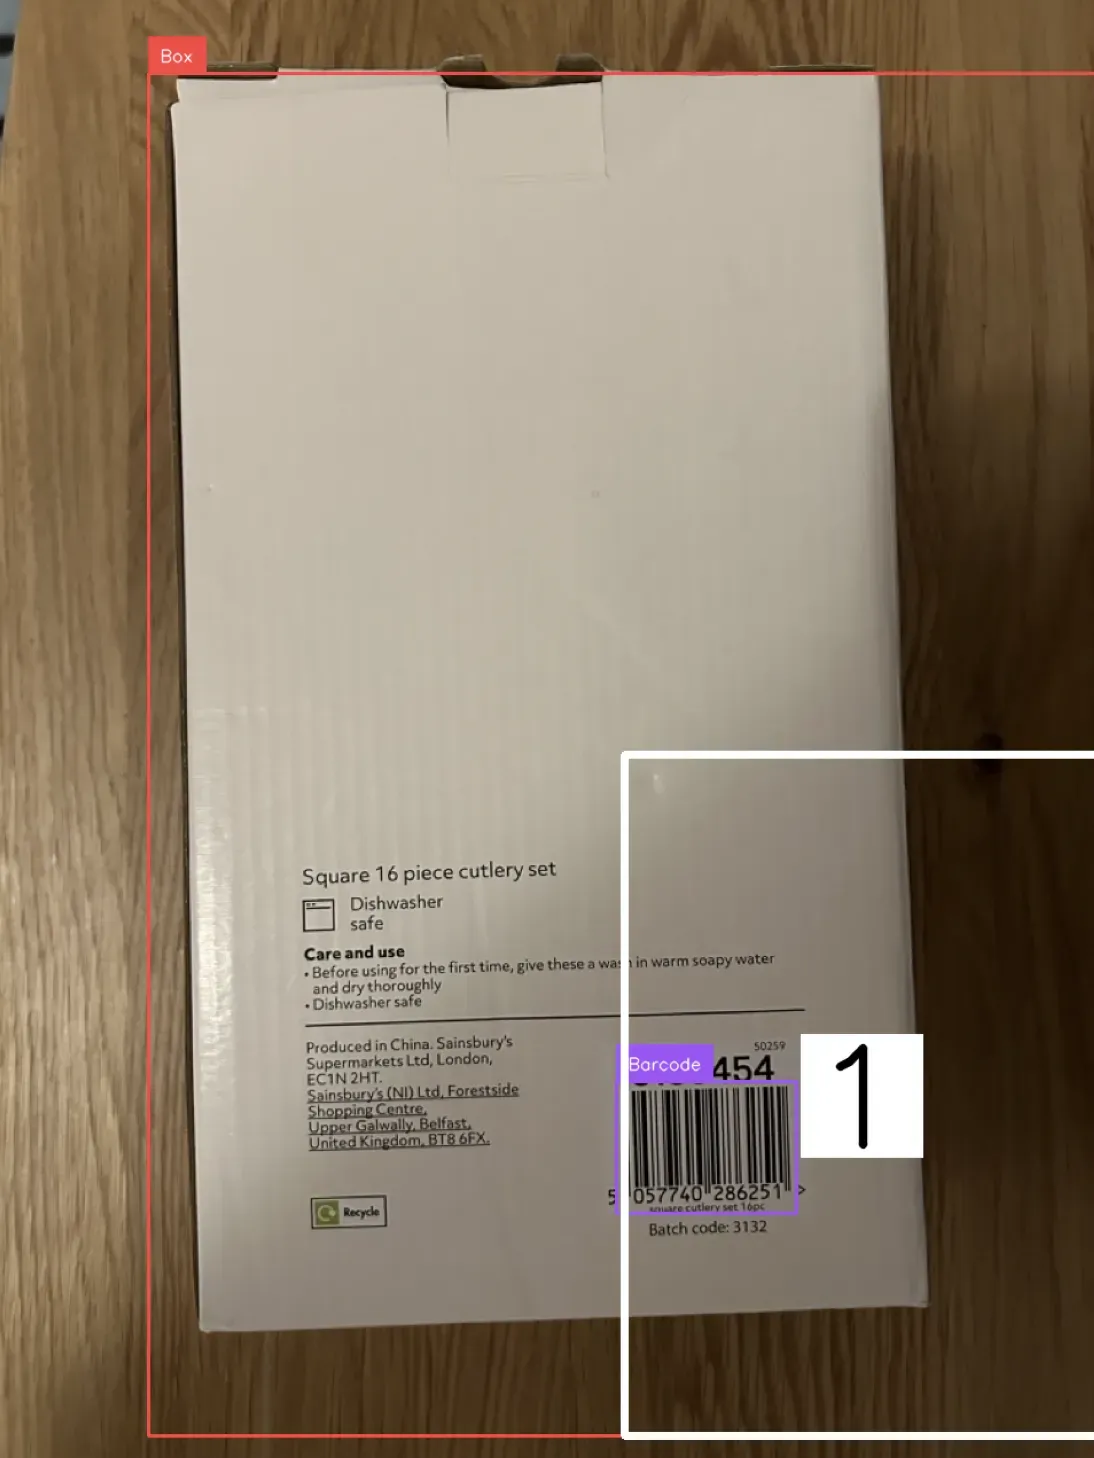
Let’s run our code on an image:
Our model successfully identified the position of the box and label in our image.
The coordinates of the box are wider than the box itself. This is because the model was not trained on boxes like the one used in the example above. For optimal model performance, we recommend training your own model to identify boxes and labels. To learn more about how to get started training your own model, refer to the Roboflow Getting Started guide.
Step #3: Verify Label Placement
We have a system that can identify the location of boxes and labels in an image. There is one missing piece before our system is complete: verifying the placement of labels.
To ensure labels are in the correct place, we can check that the coordinates for each label are in a specific region of a box. For this guide, we will suppose labels need to be in the top left corner of a package to ensure they are readable by an automated system.
Create a new Python file and add the following code:
import cv2
import numpy as np
import supervision as sv

from inference import get_roboflow_model

image = cv2.imread("box Large.jpeg")

model = get_roboflow_model(model_id="barcodedetection-pica5/1")

results = model.infer(image)

labels = [i.class_name for i in results[0].predictions]
detections = sv.Detections.from_inference(
    results[0].dict(by_alias=True, exclude_none=True)
)

bounding_box_annotator = sv.BoundingBoxAnnotator(thickness=2)
label_annotator = sv.LabelAnnotator()

box_detection = detections[detections.class_id == 1]
label_detection = detections[detections.class_id == 0]
annotated_image = bounding_box_annotator.annotate(scene=image, detections=detections)
annotated_image = label_annotator.annotate(
    scene=annotated_image, detections=detections, labels=labels
)

x1, y1, x2, y2 = box_detection.xyxy[0]

# Calculate midpoints
mx = (x1 + x2) / 2
my = (y1 + y2) / 2

# Coordinates for the bottom right quadrant
bottom_right_quadrant_x0 = int(mx)
bottom_right_quadrant_y0 = int(my)
bottom_right_quadrant_x1 = int(x2)
bottom_right_quadrant_y1 = int(y2)

zone = np.array(
    [
        [bottom_right_quadrant_x0, bottom_right_quadrant_y0],
        [bottom_right_quadrant_x1, bottom_right_quadrant_y0],
        [bottom_right_quadrant_x1, bottom_right_quadrant_y1],
        [bottom_right_quadrant_x0, bottom_right_quadrant_y1],
    ]
)
polygon_zone = sv.PolygonZone(
    polygon=zone, frame_resolution_wh=(image.shape[1], image.shape[0])
)
polygon_zone.trigger(label_detection)

zone_annotator = sv.PolygonZoneAnnotator(
    zone=polygon_zone, color=sv.Color.WHITE, thickness=6, text_thickness=6, text_scale=4
)

annotated_image = zone_annotator.annotate(scene=annotated_image)

print("Label placed in the bottom right quadrant of the box: ", "Yes" if polygon_zone.current_count > 0 else "No")

sv.plot_image(annotated_image)
In this code, we run an image through our vision model. Using the results from our vision model, we create pairs of detection. Each pair contains a detection for a package and a detection for the label that is on that box. We then check to see in what region of the package the label appears. We use the length and height of the package to assist in this calculation.
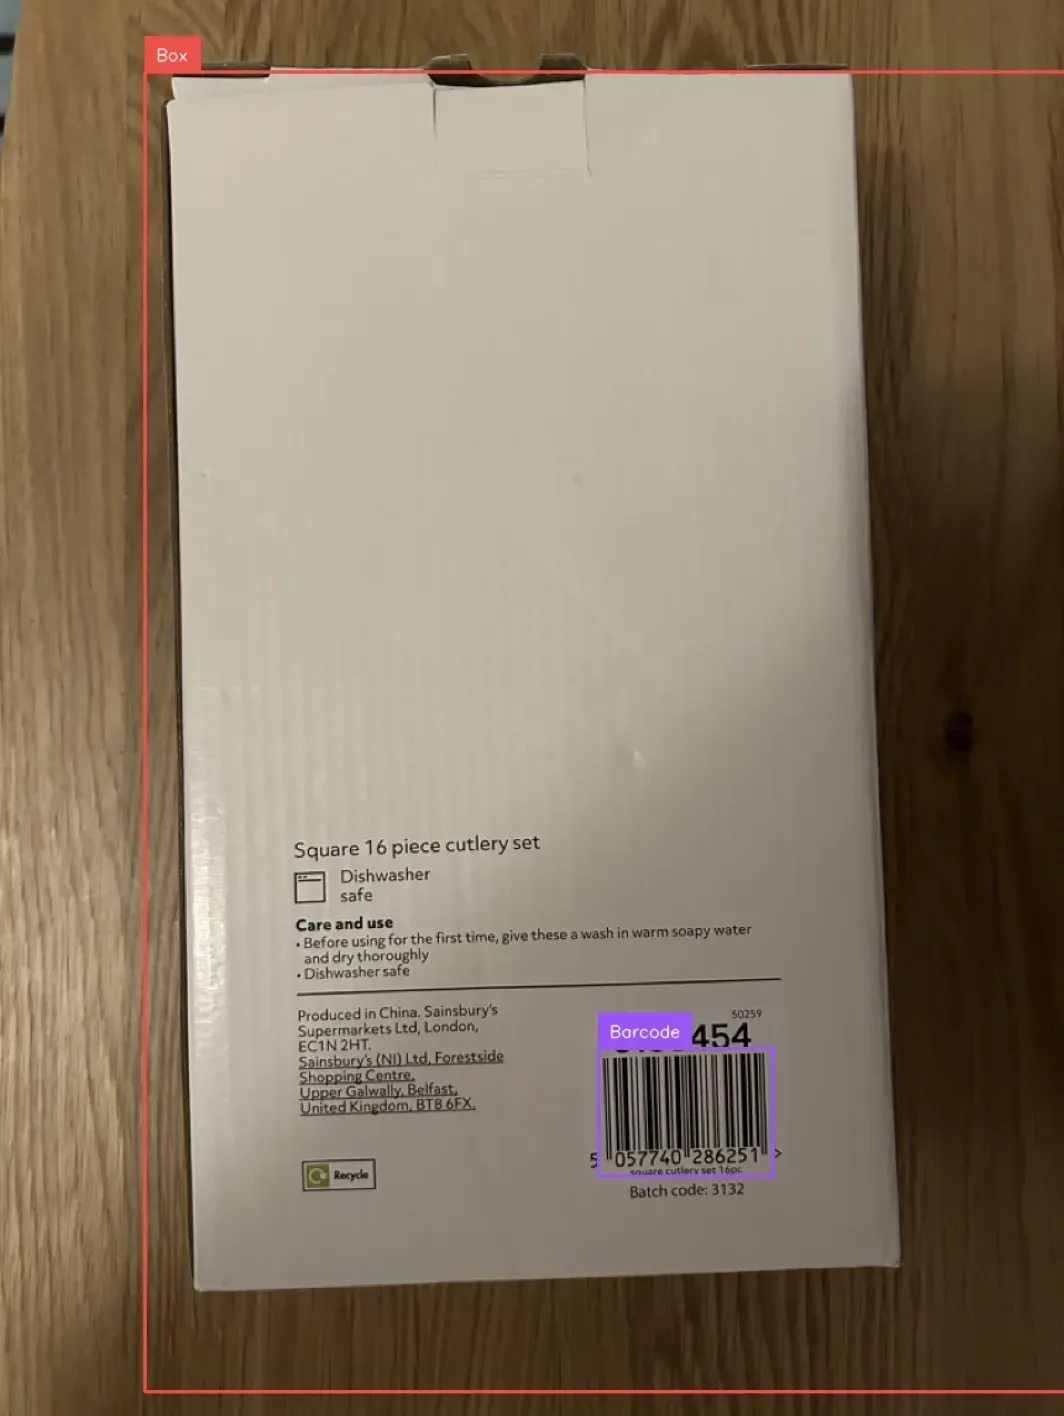
This code will print out a message that says whether a label is in the correct spot on a package. Here is the visual output from our code:

Our code returns:
Label placed in the bottom right quadrant of the box: YesOur code successfully identified the label was in the correct position.
Next Steps: Train Your Own Model
Computer vision systems perform best when trained on your own data, representative of the scenario in which your model will be deployed. For example, if your model will be run on an assembly line, training a model to identify labels on packages using data from your assembly line would allow you to achieve the best results.
You can train the first version of a vision system in an afternoon. The steps to follow are:
- Collect images
- Label images
- Train a model
- Deploy your model using the code from earlier in this guide
You can then evaluate your model in Roboflow to identify opportunities for improvement.
To get started training your own model, refer to the Roboflow Getting Started guide.
Conclusion
In this guide, we walked through how to verify label placement on packages. We tested a pre-trained model hosted on Roboflow Universe that identifies the location of packages and labels in an image. We then deployed the model on our own hardware using Inference. Finally, we wrote logic that verifies a label is correctly positioned on a package.
If you need assistance training your own vision model, contact the Roboflow sales team. Our sales team are experts in developing custom computer vision solutions for manufacturing and logistics use cases.
