
Once you can identify objects of interest in a video, there are many different types of logic you can use to monitor for different events in the video. You can monitor for objects being present or not present, record when too many objects are visible, or send an alert when a certain amount of time passes with no objects visible.
In this guide, we are going to show you how to monitor a video with computer vision. The logic and code we show below can be applied to any custom vision model. With the logic we show, you will have all you need to monitor videos for different scenarios.
Without further ado, let’s begin!
Prepare a Model
Before we can start monitoring a video, we need a model on which we can run inference.
For this guide, we will be using an aluminum can detection model trained with Autodistill and hosted on Roboflow Universe. You can use any model you want. We will be processing saved videos, which is ideal for testing and writing logic. You can substitute the video loader with a webcam loader for use in production.
We will run inference using Roboflow Inference, a production-ready server whose code powers millions of inferences around the world. Roboflow Inference is powered by Docker. Follow the official Docker installation instructions if Docker is not already installed on your machine.
With Docker installed, we need to install Inference. The command to install Inference is slightly different depending on the system on which you are running. For example, the following command lets you install Inference on a machine with an NVIDIA GPU:
docker pull roboflow/roboflow-inference-server-gpuRefer to the “Pull” section of the Inference installation instructions to find the command relevant to the device you are using.
This command will download, configure, and start a Roboflow Inference server at http://localhost:9001.
Next, we need to install a few dependencies:
pip install roboflow supervision numpyNow we can initialize our model with which we will work to monitor a video of aluminum cans.
Open up a new Python file and add the following code:
import supervision as sv
import numpy as np
import roboflow
import cv2

INPUT_VIDEO = "cans.mp4"

roboflow.login()

rf = roboflow.Roboflow()

project = rf.workspace().project("aluminum-can-detection-model")

model = project.version(1).model
Substitute:
cans.mp4with the name of the video you want to process.aluminum-can-detection-modelwith your Roboflow project ID. Learn how to retrieve your project ID.1with your Roboflow version ID. Learn how to retrieve your version ID.
This code imports the dependencies we will need and loads a model that we can use.
The first time you run this script, you will be asked to log in to Roboflow to authenticate with your account. You can also run the following command before running the script to authenticate with an API key instead:
export ROBOFLOW_API_KEY=""Learn how to retrieve your Roboflow API key.
Next, we can initialize logic to read a video and process each frame. Add the following code to your Python file:
CLASSES_TO_CHECK = ["can"]

CLASS_IDX = {class_name: i for i, class_name in enumerate(CLASSES_TO_CHECK)}

CLASS_ID_TO_FILTER = [CLASS_IDX[class_name] for class_name in CLASSES_TO_CHECK]

detections_buffer = []

for i, frame in enumerate(sv.get_video_frames_generator(source_path=INPUT_VIDEO)):
    if len(detections_buffer) > 240:
        detections_buffer.pop(0)

    inference_results = model.predict(frame)

    detections = sv.Detections.from_inference(inference_results.json(), class_list=CLASSES_TO_CHECK)

    detections = detections[np.isin(detections.class_id, CLASS_ID_TO_FILTER)]

    detections_buffer.append(detections)

    box_annotator = sv.BoxAnnotator()

    labels = [
        f"{CLASSES_TO_CHECK[class_id]} {confidence:0.2f}"
        for _, _, confidence, class_id, _
        in detections
    ]

    annotated_frame = box_annotator.annotate(
        scene=frame.copy(),
        detections=detections,
        labels=labels
    )

    cv2.imshow("frame", annotated_frame)
    cv2.waitKey(1)
There is a lot going on here, so let’s break it down into smaller pieces. First, we say that we want to look for the class “can”. We can add as many classes as we want here. Then, we map the class to its class ID, which is used for tracking detections.
For each frame in a given video (the INPUT_VIDEO value we set in the last section), inference is run.
We keep track of the predictions from the last 10 frames. This is because computer vision models don’t return fully consistent predictions frame-to-frame. We can use this buffer to ensure a missed prediction in a single frame doesn’t cause our alert system to trigger.
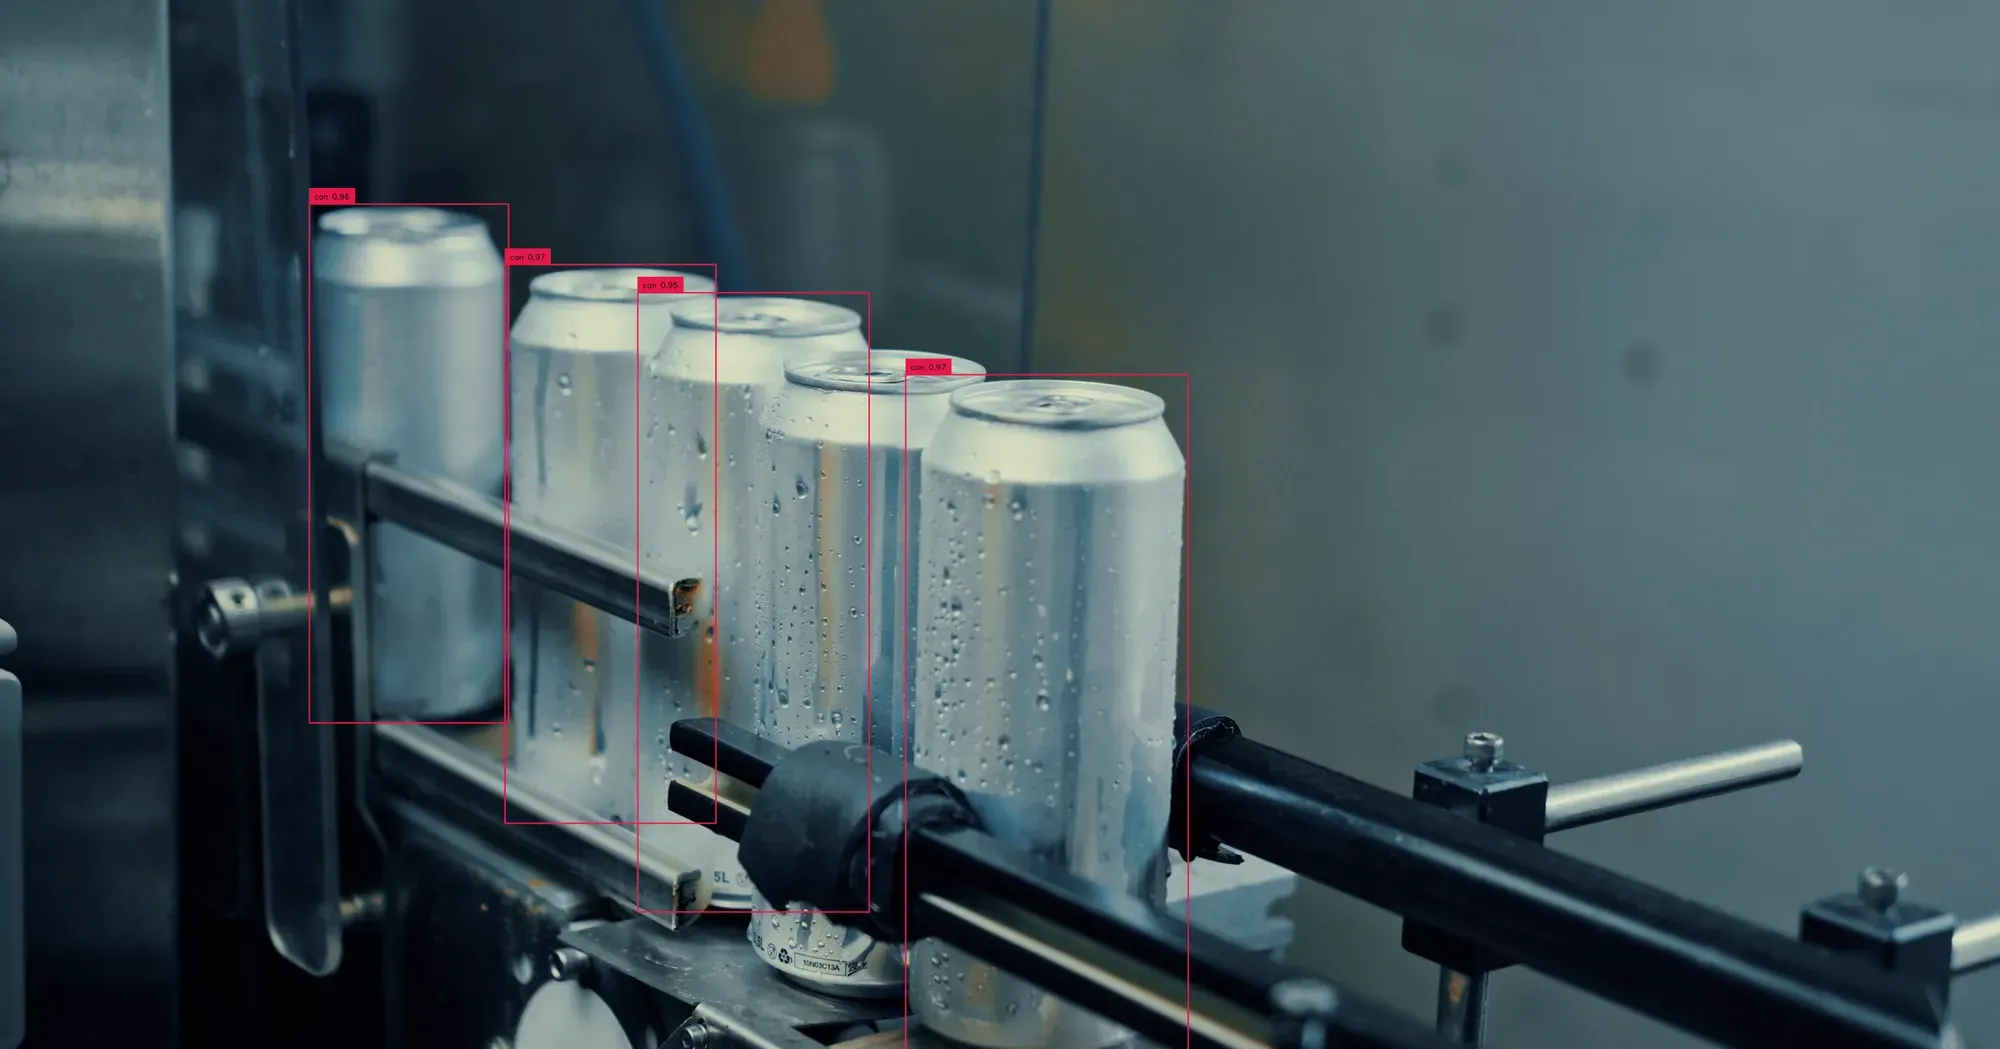
We also create an annotated frame that shows the position of predictions, which we use to visualize our model results. The frame is shown with all bounding boxes.
Here is an example of a frame that has been plotted with predictions:
To read from a video stream, replace the video frames generator with a cv2 video reader:
import cv2

frames = cv2.VideoCapture(0)

while True:
	_, frame = frames.read()
Now we are ready to start writing inference logic!
Record When No Object is Visible
Suppose we are monitoring the production line in a bottling factory. We want to know when no bottles are present in a video, which could be indicative of there being a problem upstream that needs to be addressed. We can do this with computer vision.
Add the following code below the code we wrote in the last section, above the detections_buffer.append(detections)” line of code:
detections = detections[np.isin(detections.class_id, CLASS_ID_TO_FILTER)]

# if no object in last 10 frames
if len(detections) == 0 and all(len(detections) == 0 for detections in detections_buffer):
	cv2.putText(annotated_frame, f"No objects found in the last 10 frames!", (300, 200), cv2.FONT_HERSHEY_SIMPLEX, 2, (255, 255, 255), 2)
    continue
In this code, we filter out all detections that are not in the provided list. If there is no object in the last 10 frames, our program shows a message in our video that says “No objects found in the last 10 frames!”.
We could adjust the frame count to be longer or shorter depending on our needs. For instance, we could have an alert that triggers every 480 frames (24 frames per second * 20 seconds = 480). In production, this alert could do anything. For example, you could write logic to trigger a notification on a screen or send a notification to an assembly line manager.
Here is how to write logic that triggers when 240 frames (10 seconds) pass without any detection:
for i, frame in enumerate(sv.get_video_frames_generator(source_path=INPUT_VIDEO)):
    if len(detections_buffer) > 240:
    	detections_buffer.pop(0)

    inference_results = model.predict(frame)
    detections = sv.Detections.from_inference(inference_results.json(), class_list=CLASSES_TO_CHECK)
    detections = detections[np.isin(detections.class_id, CLASS_ID_TO_FILTER)]
    detections_buffer.append(detections)

    # if no object in last 240 frames
    if len(detections_buffer) == 240 and all([len(detections) == 0 for detections in detections_buffer]):
        print("no object in last 240 frames")
        break
Note that we have adjusted our buffer size from 10 to 240 at the beginning of the for loop so that we can track more predictions.
Record When Too Many Objects Are Visible
Suppose we want to know when there are too many aluminum cans visible in view. This is indicative of there being a blockage somewhere downstream that is causing an issue with cans flowing through the assembly line. With computer vision, we can write logic to record when too many objects are visible in a camera view.
Here is the logic you need, to be added above the detections_buffer.append(detections)” line of code we wrote in the first section:
if np.mean([len(detections) for detections in detections_buffer]) > 3:
	cv2.putText(annotated_frame, f"Too many objects detected!", (300, 200), cv2.FONT_HERSHEY_SIMPLEX, 2, (255, 255, 255), 2)
This code checks if, on average, more than five detections were found in each of the last ten frames. If this is true, a message is displayed on the video saying "Too many objects detected!".
Here is an example of the script in action:
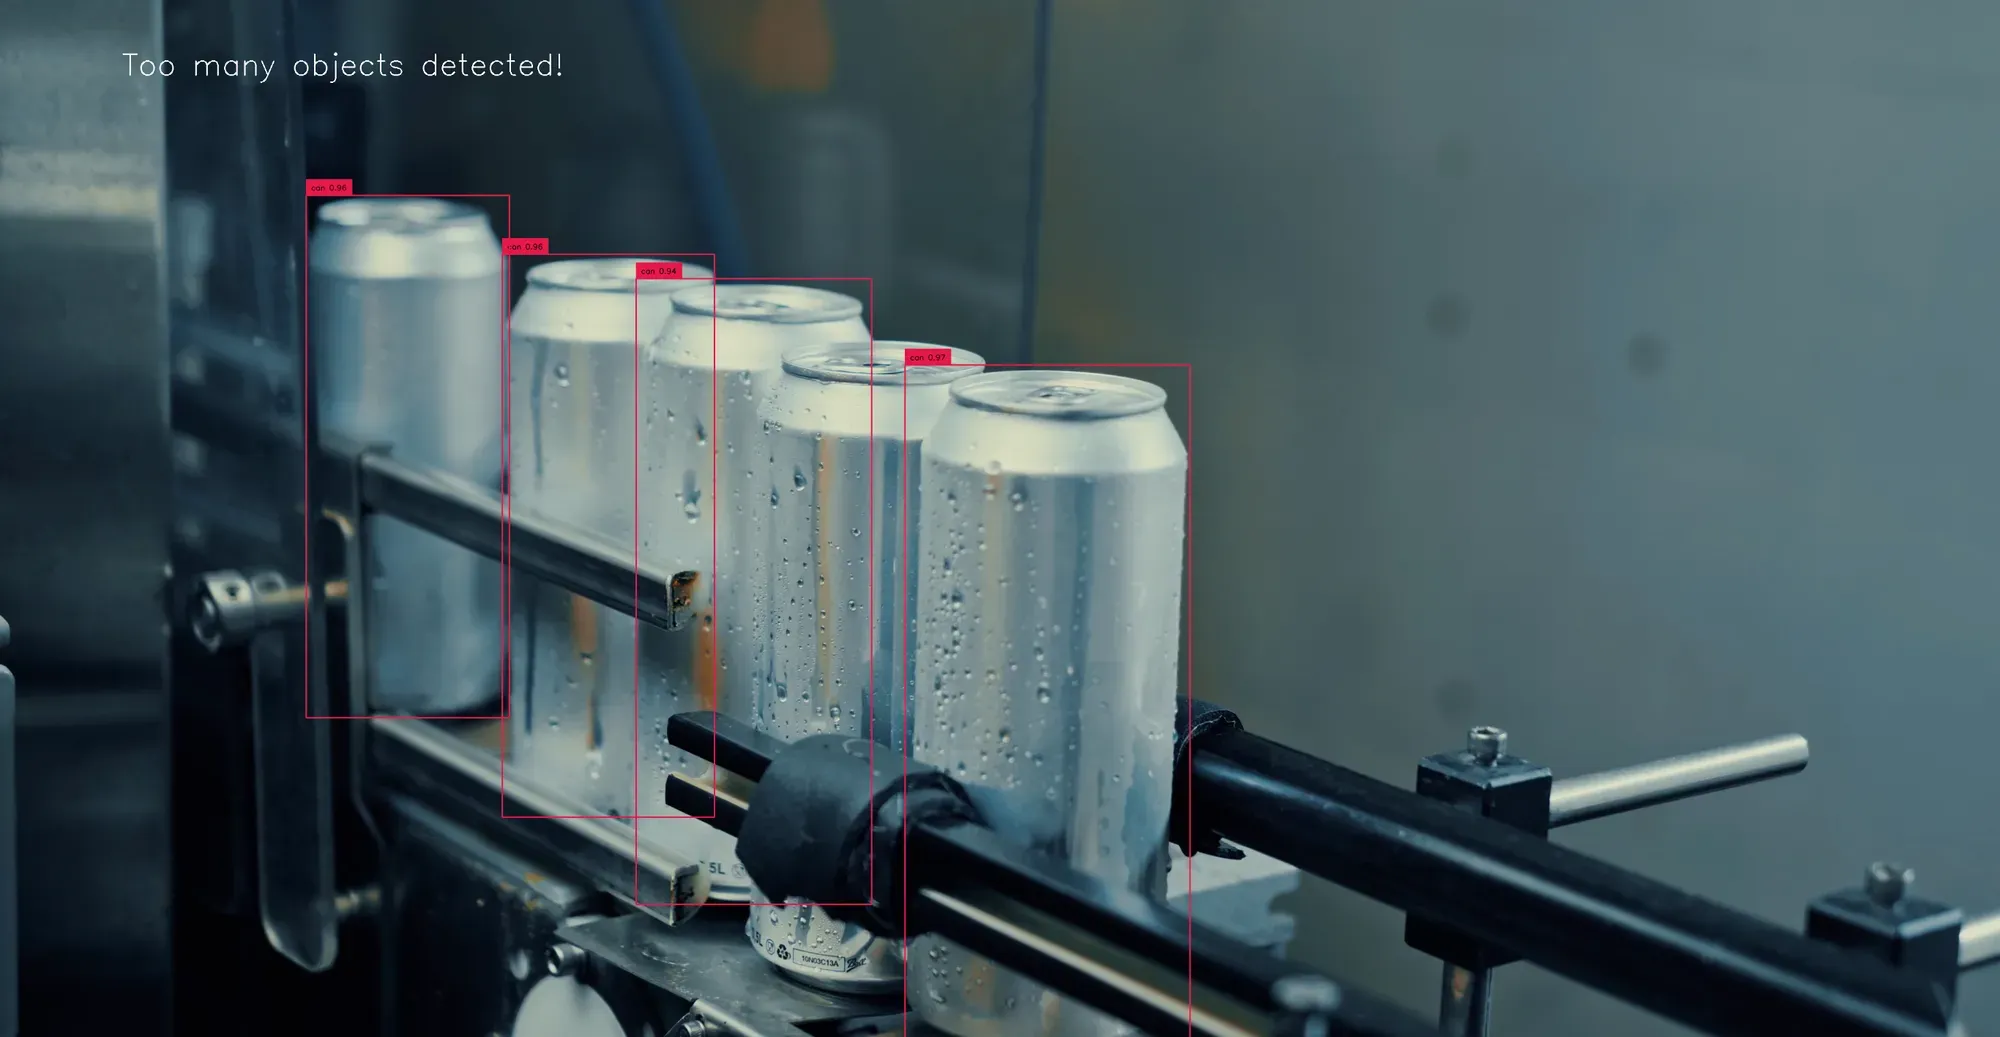
The message "Too many objects detected!" appears in the top left corner.
We can apply the same logic from earlier to record when too many objects are visible for a certain period of time:
for i, frame in enumerate(sv.get_video_frames_generator(source_path=INPUT_VIDEO)):
    if len(detections_buffer) > 240:
    	detections_buffer.pop(0)

    inference_results = model.predict(frame)
    detections = sv.Detections.from_inference(inference_results.json(), class_list=CLASSES_TO_CHECK)
    detections = detections[np.isin(detections.class_id, CLASS_ID_TO_FILTER)]
    detections_buffer.append(detections)

    if np.mean([len(d.xyxy) for d in detections_buffer if len(d.xyxy) > 0]) > 3 and len(detections_buffer) == 240:
    	print("Too many objects detected!")
Here, we calculate the average number of detections in each of the last 240 frames. We ignore any frame in which there were zero detections, just in case the model failed to run inference on those frames (i.e. the camera went blurry and there were no detections).
If the average frame contains more than 4 objects, our logic prints the message “No object in the last 240 frames” to the console.
Conclusion
Once you have a fine-tuned vision model, you can write custom logic that monitors videos for different scenarios and triggers an alert as necessary. In this guide, we have shown how to monitor for when no object is visible for a certain period of time, for when an anomalous object is visible, and when too many objects are visible in a video.
We showed these scenarios in the context of a bottling plant, where monitoring an assembly line for continuity of equipment operations is a critical part of maintaining a consistent output and meeting production targets.
With the code above, you can integrate your own alert systems, such as:
- Record a prediction or set of predictions to a CSV file;
- Trigger an alarm when a condition is met, and;
- Send a notification to a quality assurance manager when a condition is met.
Now you have all the knowledge you need to monitor videos with computer vision!